Create a SAML Profile
-
Complete the configurations according to the guidelines below:
Table 1: Fields on the SAML profile tab Field
Description
SAML Profile SAML Profile
Enable or disable SAML authentication. ACS URLs
View the Assertion Consumer Service (ACS) URLs. The ACS URL directs your IdP where to send its SAML response after authenticating a user. Identity Provider (IdP) Configuration
Directory Synchronization
Enable to use the user groups from your IdP directories in Secure Edge policy. Supported IdPs are Okta and Entra ID (Azure AD).
Identity Provider
Select an IdP. Available IdPs for directory synchronization are Okta and Entra ID (Azure AD).
Okta Configurations
Security API Token
Enter the Okta API token created using the API > Token > Create token menu on Okta admin console for Juniper Secure Edge. API token is valid for 30 days.
If SAML profile or directory synchronization is made inactive/disabled for more than 30 days, it is revoked and cannot be used again. For reconfiguration, you need to create a new token.
Tenant Domain
Enter the domain configured in Okta. Locate the Okta domain by clicking your username in the top-right corner of the Okta admin console. The domain appears in the dropdown menu.
Validate
Click validate button to test the validity of the configurations.
Entra ID Configurations
Application ID
Enter the Application (client) ID assigned to you after completing App registrations on Microsoft Entra admin center for Juniper Secure Edge.
Directory (tenant) ID
Enter the Directory (tenant) ID assigned to you after completing App registrations on Microsoft Entra admin center for Juniper Secure Edge.
Client Secret
Enter the client secret generated using Certificates & secrets > Client secrets menu on Microsoft Entra admin center for Juniper Secure Edge. Microsoft Entra generates client secret with expiry date, so update client secret before expiry date.
Validate
Click validate button to test the validity of the configurations.
IdP Settings
-
Select Import Settings to import the IdP metadata in one go. The metadata file must be in XML format.
-
To manually configure the IdP settings, select Enter settings manually.
-
To copy the settings from an URL, select Enter metadata URL.
Import Click Browse, select the IdP metadata in XML format and click Open. Entity ID Enter the unique identifier for the IdP. If you import IdP metadata, the information will be updated automatically. Login URL Enter the redirect URL for user authentication in IdP. If you import IdP metadata, the information will be updated automatically. IdP certificate Click Browse and upload the IdP certificate to decrypt the SAML reponse. If you import IdP metadata, the information will be updated automatically. Metadata URL
Enter the IdP metadata URL. The Service Provider (SP) uses the metadata URL to validate that the SAML assertions are issued from the correct IdP.
Service Provider (SP) Configuration
Entity ID
Displays the unique identifier for the SAML Profile.
Username attribute
Enter the username attribute for SAML.
Username attribute is mandatory and must be in e-mail address format. The username attribute is mapped to the user data, which is provided by IdP in the SAML assertion response.
Sign auth requests
Enable the toggle button to sign the SAML authentication requests sent from Juniper Secure Edge to IdP. If you enable sign authentication requests, you must provide both private key and public key certificate.
Private key
Enter the private key that you have generated locally. In Juniper Secure Edge, the private key is used to sign SAML authentication request. The private key is not shared with IdP.
Public key
Enter the public key that you have generated locally. The public key certificate is generated locally by the user. You must upload the same public key certificate in the IdP portal. In IdP, the public key certificate is used to validate the SAML authentication request sent by Juniper Secure Edge.
Group attribute
Enter the group attribute which the end-user belongs to which is then filtered and sent to IDP.
First name attribute
Enter the first name attribute of the SAML user.
The first name attribute is used to create an user profile.
Last name attribute
Enter the last name attribute of the SAML user.
The last name attribute is used to create an user profile.
Note:-
For SAML, the retries and the locking period is configurable in SAML server.
-
By default, directory synchronization runs at regular intervals.
Figure 1: IdP Attributes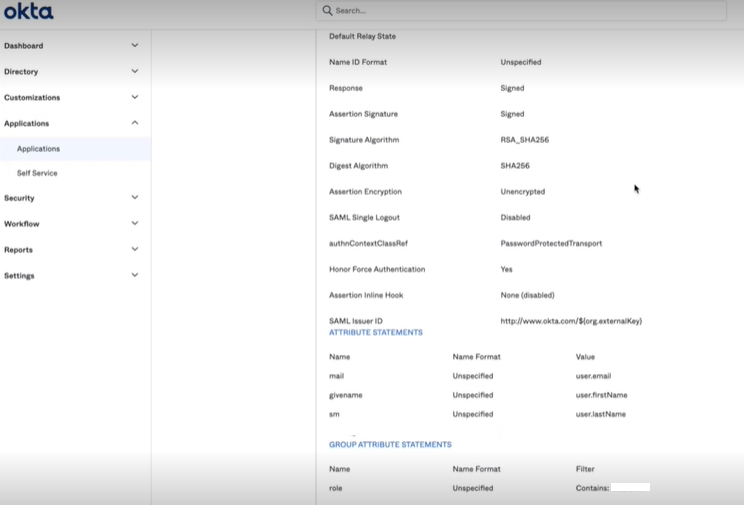 Figure 2: IdP Metadata URL
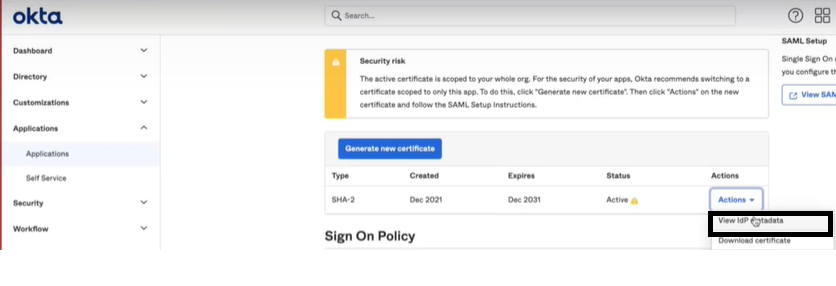
-