- play_arrow Overview
- play_arrow Platform Considerations
- play_arrow WAN Configuration for SRX Series Firewalls
- WAN Assurance Configuration Overview
- Configure Sites and Variables for SRX Series Firewalls
- Configure Applications for SRX Series Firewalls
- Configure Networks for SRX Series Firewalls
- Configure Application Policies on SRX Series Firewalls
- Configure Hub Profiles for SRX Series Firewalls
- Configure WAN Edge Templates for SRX Series Firewalls
- Routing Configuration on SRX Series Firewalls
- Onboard SRX Series Firewalls for WAN Configuration
- IDP-Based Threat Detection for SRX Series Firewalls
- Enable Application Visibility on SRX Series Firewalls
- Monitor the Service Status of SRX Series Firewalls
- Upgrade a WAN Edge SRX Series Firewalls
- Configure a Custom VR for SRX Series Firewalls
- Revoke DHCP Lease on a WAN Edge Device
- Reserve DHCP IP Address
- play_arrow WAN Assurance Design
- play_arrow Secure Edge Connector
- play_arrow Cellular Edges
- play_arrow Monitor and Troubleshoot
- WAN Assurance Monitoring, SLE, and Troubleshooting Overview
- Monitor SRX Series Firewall Deployed as WAN Edge
- Monitor Session Smart Router Deployed as WAN Edge
- Service-Level Experiences for Session Smart Router Deployed as WAN Edge
- Troubleshoot Session Smart Router Deployed as WAN Edge
- Speed Tests for Session Smart Router Deployed as a WAN Edge (BETA)
- Dynamic and Manual Packet Captures
- Troubleshoot SRX Series Firewalls
- Replace a WAN Edge Device
- WAN Edge Testing Tools
Configure Applications for Session Smart Routers
Applications represent traffic destinations. On the Juniper® Session Smart™ Router, applications create services in the background for SVR. Applications can be ports, protocols, prefixes, custom domains, or app names from the built-in AppID library.
Applications are the services or apps that your network users will connect to in a Juniper Mist WAN Assurance design. You can define these applications manually in the Juniper Mist™ cloud portal. You define applications by selecting the category (such as Social Media) or selecting individual applications (such as Microsoft Teams) from a list. Another option is to use the predefined list of common traffic types. You can also create a custom application to describe anything that is not otherwise available.
For users to access applications, you must first define the applications and then use application policies to permit or deny access. That is, you associate these applications with users and networks and then assign a traffic-steering policy and access rule (allow or deny).
Configure Applications
To configure applications:
- Click the Add Applications button in the upper right
corner.
The Add Application window appears.
Table 1 summarizes the options you can set in an application configuration.Tip: When working on configuration screens, look for the VAR indicators. Fields with this indicator allow site variables.The fields with this label also display the matching variables (if configured) as you start typing a specific variable in it. This field lists variables from all sites within the organization.
The organization-wide list of variables can be viewed using GET /api/v1/orgs/:org_id/vars/search?var=*. This list is populated as variables are added under site settings.
Table 1: Applications Options Fields Description Name Enter a unique name for the application. You can use upto 32 characters for naming the application including alphanumerics, underscores, and dashes. Description Enter a description of the application and context. Type Enter the application type: Custom Applications. See Configure Applications with Custom Applications.
Predefined Applications. See Configure Applications with Predefined Applications.
URL Categories. See Configure Applications with URL Categories.
Custom URLs. See Configure Applications with Custom URLs.
IP Address (For custom applications) Enter the network IP address, including prefix (if any) of the application. Domain Name Enter the domain name of the application. The domain name is used in cloud breakout profiles to generate the fully qualified domain name (FQDN). The cloud security providers use the FQDN to identify the IPsec tunnels.
For example, juniper.example.com.
Protocol and Port Ranges (For custom applications) Enter details about protocols, protocol numbers, and port ranges (start and end ports) that the application is using. Note:Click the blue Add (+) icon to select multiple protocols.
Advanced Settings Configure the optional advanced traffic type settings that includes: - Traffic type—Select the type of traffic (example: voice, video, data). The portal provides a list of predefined traffic type. When you select any of the defined traffic types such as gaming or video streaming, all the below parameters will be selected automatically. If you select Custom, you can configure the following values:
- Failover
policy
(Session Smart Routers
only)—Revertible or
Non-revertible.
- Revertible: Traffic automatic switches back to the primary link when the primary link recovers.
- Non-Revertible: Requires manual intervention to revert to the primary link. When traffic switches to the secondary link due to primary link failure, it does not automatically revert back to the primary link.
- None: Disable session failover. If the primary link on your device fails to meet the Service Level Agreement (SLA), existing sessions remain on the primary link, while new sessions will be redirected to the secondary link. When the primary link recovers and meets the SLA, existing sessions on the secondary link will continue, and any new sessions will start on the primary link. This behavior remains consistent even if the entire link goes down.
- Traffic class—Best effort, High,Medium, and Low.
- Best Effort: No special treatment, suitable for non-critical data.
- Medium: Prioritized over Best Effort, used for non-latency-sensitive applications.
- High: Critical applications with low latency requirements.
- Low: Background or non-urgent traffic
- DSCP class—DSCP Class in the range 0-63. When you select a traffic class (Best Effort, High, Medium, or Low), the applicable default DSCP Class value is displayed as a help text. You can choose to override it. By configuring DSCP classes, you can map specific traffic types to appropriate QoS levels.
- Maximum latency—Maximum latency in the range 0-4294967295. Setting a maximum latency threshold ensures that SD-WAN avoids links with excessive delay
- Maximum jitter—Maximum jitter in the range 0-4294967295. By specifying a maximum jitter threshold, SD-WAN selects stable links to maintain predictable performance
- Maximum loss—Maximum loss in the range 0-100. Configuring a maximum loss threshold helps SD-WAN avoid links with high packet loss rates.
Configure Applications with Custom Applications
Juniper Mist cloud enables you to define your own custom applications with destination IP addresses or domain names.
When defining custom applications, you can:
Use multiple destination IP addresses or domain names separated by a comma to define a single application.
Select a protocol (any, TCP, UDP, ICMP, GRE, or custom) and port range to narrow down your selection. This option enables the system to identify the destination at a granular level.
Define a prefix of 0.0.0.0/0 with protocol “any” . A prefix of 0.0.0.0/0 with protocol “any”, is resolved to any host within the Juniper Mist WAN Assurance policy.
To define custom applications:
Configure Applications with Predefined Applications
Juniper Mist cloud provides a list of known applications that you can use to define an Application.
To configure predefined applications:
- Click the Add (+) icon to display the list of
available predefined applications. Figure 1: Predefined Applications
 Applications that are specific to only SSRs are marked as 'SSR Only'.
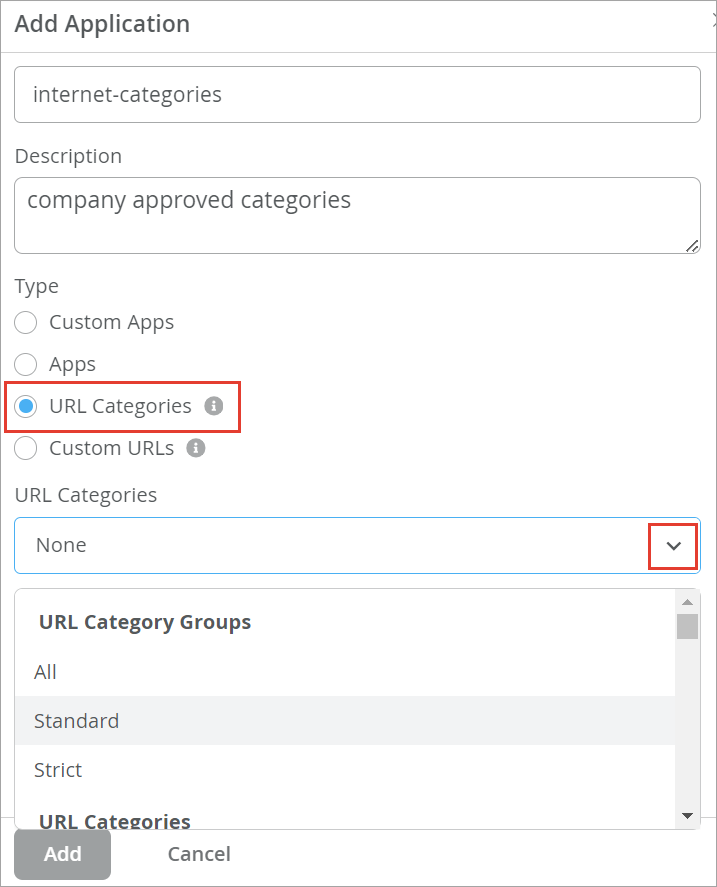
Configure Applications with URL Categories
Juniper Mist cloud provides a list of URL categories based on types (example: shopping, sports) and grouped by severity (all, standard, strict). You can use the URL categories to define an application. URL categories offer granular filtering for application creation. You can select a single or multiple URL categories for an application.
To define URL categories:
- Click the Add (+) icon to display the list of
available URL categories Figure 2: URL Categories
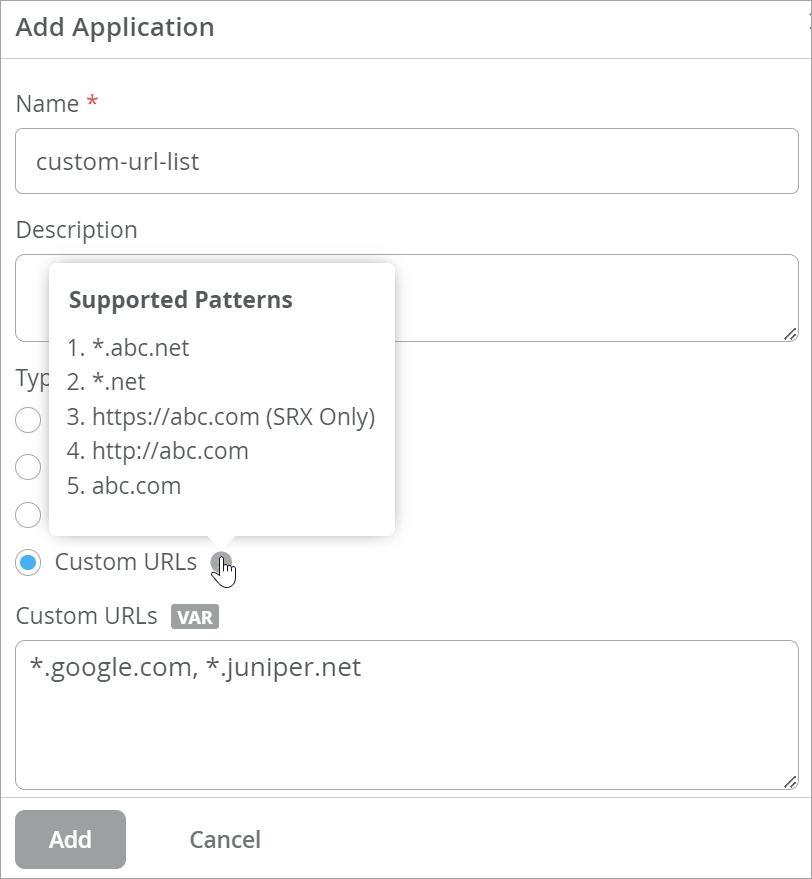
Configure Applications with Custom URLs
To define custom URLs:
- Enter the custom URLs. Use a comma separator if you need to specify
multiple URLs.
Mist supports only the asterisk( * ) wildcard pattern. You can specify up to 15 URL patterns for an application. You can view the supported patterns by hovering the mouse over the tooltip icon. Note that you can use the https://abc.com pattern only for SRX Series devices.
Figure 3: Custom URLs