Help us improve your experience.

Let us know what you think.

Do you have time for a two-minute survey?

Announcement: Try the Ask AI chatbot for answers to your technical questions about Juniper products and solutions.

close
header-navigation
keyboard_arrow_up
close
keyboard_arrow_left
list Table of Contents
file_download PDF
{ "lLangCode": "en", "lName": "English", "lCountryCode": "us", "transcode": "en_US" }
English
keyboard_arrow_right

Replacing an MX960 Fan Tray

date_range 09-Mar-21

Removing an MX960 Fan Tray

Note:

To prevent overheating, install the replacement fan tray immediately after removing the existing fan tray.

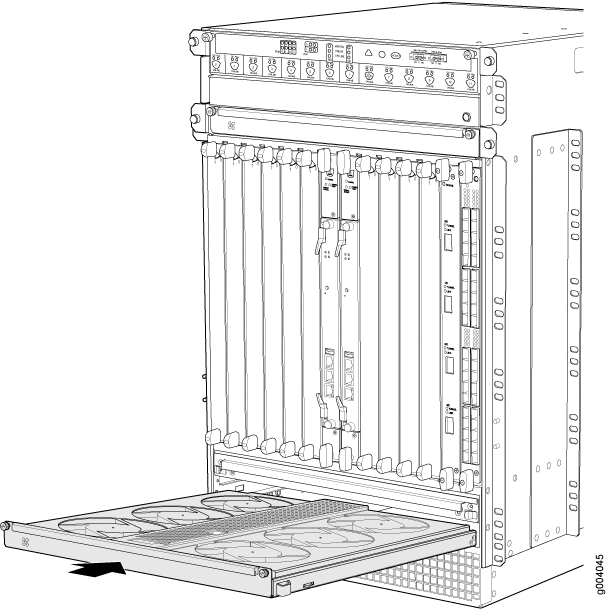
To remove the upper or lower fan tray (see Figure 1 and Figure 2):

  1. Attach an ESD grounding strap to your bare wrist, and connect the other end of the strap to an ESD grounding point.
  2. Reposition the standard cable manager before removing the lower front fan tray:
    Note:

    This step is not required for the extended cable manager.

    1. Unwrap any cables on the standard cable manager and remove the cables from the tray. Arrange the cables so that they do not block the front of the cable manager and tray, and secure them with temporary fasteners so that they are not supporting their own weight as they hang from the connector.
    2. Simultaneously pull the two releases labelled PULL on the cable manager. Lift it up and outward to lock it in place.
  3. Loosen the captive screw on each side of the fan tray faceplate.
  4. Grasp both sides of the fan tray, and pull it out approximately 1 to 3 inches.
    Warning:

    To prevent injury, keep tools and your fingers away from the fans as you slide the fan module out of the device. The fans might still be spinning.

  5. Pause for approximately 15 seconds to allow the fans to stop spinning.
  6. When the fans stop spinning, press on the two latches located on the inside of the fan tray.
  7. Place one hand under the fan tray to support it, and pull the fan tray completely out of the chassis.
Figure 1: Removing an Upper Fan TrayRemoving an Upper Fan Tray
Figure 2: Removing a Lower Fan TrayRemoving a Lower Fan Tray

Installing an MX960 Fan Tray

To install a fan tray (see Figure 3 and Figure 4):

  1. Attach an ESD grounding strap to your bare wrist, and connect the other end of the strap to an ESD grounding point.
  2. Grasp the fan tray on each side, and insert it straight into the chassis. Note the correct orientation by the "this side up" label on the top surface of the fan tray.
  3. Tighten the captive screws on each side of the fan tray faceplate to secure it in the chassis.
  4. Lower the cable manager back into position, if necessary.
Figure 3: Installing an Upper Fan TrayInstalling an Upper Fan Tray
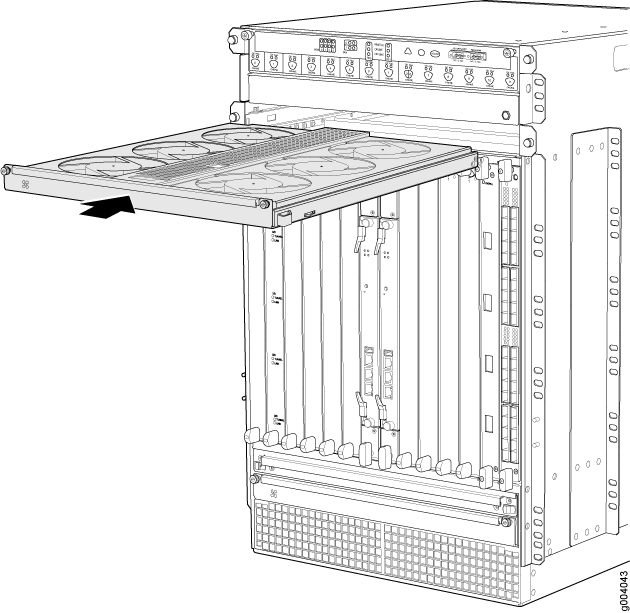
Figure 4: Installing a Lower Fan TrayInstalling a Lower Fan Tray
footer-navigation