- play_arrow Fast Track: Initial Installation
- play_arrow Overview
- play_arrow System Overview
- play_arrow Chassis Components and Descriptions
- MX960 Chassis Description
- MX960 Component Redundancy
- MX960 Router Hardware and CLI Terminology Mapping
- MX960 Midplane Description
- MX960 Rack-Mounting Hardware
- MX960 Craft Interface Overview
- MX960 Alarm Relay Contacts on the Craft Interface
- MX960 Alarm LEDs and Alarm Cutoff/Lamp Test Button
- MX960 Component LEDs on the Craft Interface
- MX960 Cable Manager Description
- play_arrow Cooling System Components and Descriptions
- play_arrow Host Subsystem Components and Descriptions
- play_arrow Interface Modules—DPCs
- play_arrow Interface Modules—FPCs and PICs
- play_arrow Interface Modules—MPCs and MICs
- MX960 Application Services Modular Line Card Description
- MX960 Application Services Modular Storage Card Description
- MX960 Application Services Modular Processing Card Description
- MX960 AS MSC LEDs
- MX960 AS MXC LEDs
- MIC/MPC Compatibility
- MX960 Modular Interface Card Description
- MX960 Modular Interface Card (MIC) LEDs
- MICs Supported by MX Series Routers
- MX960 MIC Port and Interface Numbering
- MX960 Modular Port Concentrator Description
- MX960 Modular Port Concentrator LEDs
- MPCs Supported by MX Series Routers
- play_arrow Services Processing Card—MX-SPC3
- play_arrow Power System Components and Descriptions
- play_arrow Switch Control Board Components and Descriptions
-
- play_arrow Site Planning, Preparation, and Specifications
- play_arrow Preparation Overview
- play_arrow Transceiver and Cable Specifications
- play_arrow Pinout Specifications
- play_arrow AC Power Requirements, Specifications, and Guidelines
- play_arrow DC Power Requirements, Specifications, and Guidelines
- play_arrow High-Voltage Second-Generation Universal (HVAC or HVDC) Power Requirements, Specifications, and Guidelines
- Electrical Specifications for the MX960 High-Voltage Second-Generation Universal (HVAC/HVDC) Power Supply
- Power Requirements for an MX960 Router
- Calculating Power Requirements for MX960 Routers
- High-Voltage Second-Generation Universal (HVAC or HVDC) Power Circuit Breaker Requirements for the MX960 Router
- High-Voltage Second-Generation Universal (MX960-PSM-HV) Power Cord Specifications for the MX960 Router
-
- play_arrow Installing and Replacing Components
- play_arrow Overview of Installing and Replacing Components
- play_arrow Installing Components
- Installing the MX960 Craft Interface
- Installing the MX960 Air Filter
- Installing an MX960 Fan Tray
- Installing an MX960 Routing Engine
- Installing an MX960 Switch Control Board
- Installing an MX960 DPC
- Installing an MX960 FPC
- Installing an MX960 MIC
- Installing an MX960 Dual-Wide MIC
- Installing an MX960 MPC
- Installing an MX960 PIC
- Installing a Cable on an MX960 DPC, MPC, MIC, or PIC
- Installing a MX960 AC Power Supply or High-Voltage Second-Generation Universal (HVAC or HVDC)
- Installing an MX960 DC Power Supply
- Installing an MX960 AS MLC
- Installing an MX960 AS MSC
- Installing an MX960 AS MXC
- Installing an SFP or XFP Transceiver into an MX960 DPC, MPC, MIC, or PIC
- Replacing a CFP2 Transceiver
- Replacing a CFP Transceiver
- play_arrow Replacing Chassis Components
- play_arrow Replacing Cooling System Component
- play_arrow Replacing Host Subsystem Components
- Replacing an MX960 Routing Engine
- Replacing an SSD Drive on an RE-S-1800
- Replacing an SSD Drive on an RE-S-X6-64G
- Replacing Connections to MX960 Routing Engine Interface Ports
- Upgrading to the RE-S-X6-64G Routing Engine in a Redundant Host Subsystem
- Upgrading to the RE-S-X6-64G Routing Engine in a Nonredundant Host Subsystem
- play_arrow Replacing Line Card Components
- play_arrow Replacing Power System Components
- play_arrow Replacing and Upgrading Switch Control Boards
-
- play_arrow Maintaining the Chassis and Components
- play_arrow Routine Maintenance Procedures
- play_arrow Maintaining Components
- Tools and Parts Required to Maintain the MX960 Router
- Maintaining the MX960 Air Filter
- Maintaining the MX960 Fan Trays
- Maintaining the MX960 Host Subsystem
- Maintaining MX960 DPCs
- Holding an MX960 DPC
- Storing an MX960 DPC
- Maintaining MX960 FPCs
- Holding an MX960 FPC
- Storing an MX960 FPC
- Maintaining MX960 MICs
- Maintaining MX960 MPCs
- Maintaining MX960 PICs
- Maintaining Cables That Connect to MX960 DPCs, MPCs, MICs, or PICs
- Maintaining MX-SPC3 Services Card
- Maintaining the MX960 Power Supplies
- Verifying the Version of the MX960 Cable Manager
- play_arrow Converting to a Different Type of Power Supply
-
- play_arrow Troubleshooting Hardware
- play_arrow Knowledge Base
- play_arrow Troubleshooting Components
-
- play_arrow Contacting Customer Support and Returning the Chassis or Components
- play_arrow Contacting Customer Support
- play_arrow Locating Component Serial Numbers
- Displaying MX960 Router Components and Serial Numbers
- MX960 Routing Engine Serial Number Label
- MX960 Chassis Serial Number and Agency Label
- MX960 Craft Interface Serial Number Label
- MX960 Fan Tray Serial Number Label
- MX960 Power Supply Serial Number Labels
- MX960 MIC Serial Number Label
- MX960 MPC Serial Number Label
- MX960 PIC Serial Number Label
- MX960 FPC Serial Number Label
- MX960 DPC Serial Number Label
- MX960 SCB Serial Number Label
- MX960 Midplane Serial Number Label
- Contact Customer Support
- play_arrow Packing and Returning Components
-
- play_arrow Safety and Compliance Information
- play_arrow General Safety Guidelines and Warnings
- play_arrow Installation and Maintenance Safety Guidelines and Warnings
- play_arrow Radiation and Laser Warnings
- play_arrow Maintenance and Operational Safety Guidelines and Warnings
- play_arrow Electrical Safety Guidelines and Warnings
- General Electrical Safety Guidelines and Warnings
- Prevention of Electrostatic Discharge Damage
- AC Power Electrical Safety Guidelines
- AC Power Disconnection Warning
- DC Power Copper Conductors Warning
- DC Power Disconnection Warning
- DC Power Grounding Requirements and Warning
- DC Power Wiring Sequence Warning
- DC Power Wiring Terminations Warning
- Midplane Energy Hazard Warning
- Multiple Power Supplies Disconnection Warning
- Action to Take After an Electrical Accident
- play_arrow Agency Approvals and Compliance Statements
- Agency Approvals for MX960 Routers
- Compliance Statements for NEBS for the MX960 Router
- Compliance Statements for EMC Requirements for the MX960 Router
- Compliance Statements for Environmental Requirements
- Compliance Statements for Acoustic Noise for the MX960 Router
- Statements of Volatility for Juniper Network Devices
-
Installing the MX960 Mounting Hardware for Front-Mounting in an Open-Frame Rack
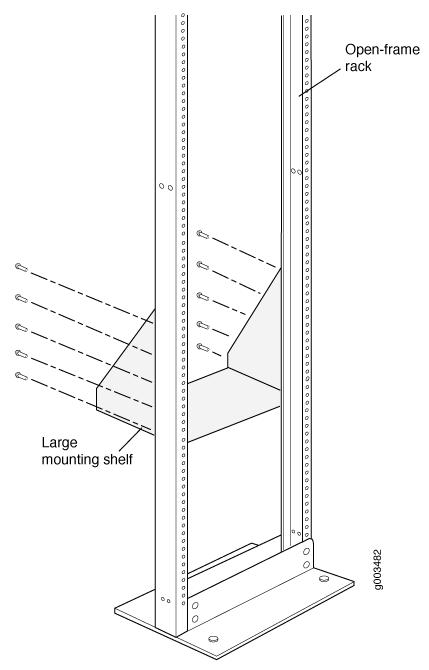
Before front-mounting the router in an open-frame rack, install the large mounting shelf on the rack, and remove the mounting brackets from the chassis. The small mounting shelf is not needed.
Table 1 specifies the holes in which you insert screws to install the mounting hardware in an open-frame rack (an X indicates a mounting hole location). The hole distances are relative to one of the standard U divisions on the rack. For reference, the bottom of all mounting shelves is at 0.04 in. (0.02 U) above a U division.
Hole | Distance Above U Division | Large Shelf | |
---|---|---|---|
30 | 17.26 in. (43.8 cm) | 9.86 U | X |
27 | 15.51 in. (39.4 cm) | 8.86 U | X |
24 | 13.76 in. (34.9 cm) | 7.86 U | X |
21 | 12.01 in. (30.5 cm) | 6.86 U | X |
18 | 10.26 in. (26.0 cm) | 5.86 U | X |
15 | 8.51 in. (21.6 cm) | 4.86 U | X |
12 | 6.76 in. (17.1 cm) | 3.86 U | X |
9 | 5.01 in. (12.7 cm) | 2.86 U | X |
6 | 3.26 in. (8.3 cm) | 1.86 U | X |
3 | 1.51 in. (3.8 cm) | 0.86 U | X |
2 | 0.88 in. (2.2 cm) | 0.50 U | X |
1 | 0.25 in. (0.6 cm) | 0.14 U |
To install the large mounting shelf (see Figure 1):
- On the rear of each rack rail, install cage nuts, if needed, in the holes specified in Table 1 for the large shelf.
- Partially insert a mounting screw into the highest hole specified in Table 1.
- Hange the shelf over the mounting screws using the keyhole slots located near the top of the large shelf flanges.
- Partially insert screws into the open holes in the flanges of the large shelf.
- Tighten all the screws completely.
After the mounting hardware is installed, proceed to Installing the MX960 Router Using a Mechanical Lift.