Deploying the vSRX as an Advanced Security Service in a VMware NSX Environment
Use the following procedures to deploy the vSRX as an advanced security service virtual machine (VM) in the VMware NSX environment. The vSRX VM is deployed in conjunction with Juniper Networks Junos Space Security Director and VMware NSX Manager. In each procedure you are instructed whether to perform the steps in the NSX Manager (from the VMware vCenter Server) or in the vSphere cluster. For example, you create the security group using the NSX Manager, but the discovery of devices happens in the vSphere cluster.
The deployment steps are performed in the following sequence :
Creating a Security Group (VMware vCenter Server)
You create a security group by using the NSX Manager from the VMware vCenter Server. Each security group is a logical collection of objects from your vSphere inventory. These objects include VMs that you want to be members in the same security group and to which you will apply the vSRX as a Juniper security service. You can apply an advanced security service policy to all the objects contained in a security group.
To create a security group from the VMware vCenter Server:
-
Click the Add Security Group icon to create
a new security group that contains the specific VMs you want as members
of the same group, as shown in Figure 1.
Figure 1: Create a New Security Group Page

Discovering the NSX Manager and Registering vSRX as a Security Service in vSphere cluster
You use the Junos Space vSphere cluster to discover the NSX Manager and perform service registration of the vSRX VM with the NSX Manager. The NSX Manager is added as a device in the Security Director, and its inventory is synchronized with the Security Director.
Ensure that SNMP is disabled in the Security Director while performing device discovery for the vSRX agent VM. If SNMP is enabled in Security Director, the vSRX agent VM discovery operation fails.
To discover the NSX Manager from the Security Director:
-
Click the Add icon (+) to add the NSX Manager
to the Security Director.
The Add NSX Manager page appears, as shown in Figure 2.
Figure 2: Add NSX Manager Page
-
Click Finish.
The Summary page of configuration changes appears. Click OK to add the NSX Manager. When you return to the NSX Managers page, you will see the discovered NSX Manager listed, as shown in Figure 3.
Figure 3: NSX Managers Page
After adding the NSX Manager, you must register the vSRX VM as a Juniper security service with the NSX Manager.
To register the vSRX instance as a Juniper security service:
-
Select the NSX Manager for which service needs to be registered, right-click or from the More list, select Register Security Service.
The Register Security Service page appears, as shown in Figure 4.
Figure 4: Register Security Service Page
-
In the Service Name field, enter the name of the Juniper security service.
-
From the vSRX OVF URL list, select the available vSRX OVF image that you copied to the Policy Enforcer machine.
-
In the vSRX Root Password field, enter the root password of the vSRX instance. The same root password will be set for all the vSRX instances deployed in NSX.
-
In the Description field, enter a description.
-
Click Register.
A confirmation message indicates whether the registration is successful or not.
The vSRX instance registered as a new service in the vSphere Web Client environment. The vSRX is added as a network service that can be deployed by the NSX Manager.
In the vSphere Web Client, verify the following:
-
Click Networking & Security and then click Service Definitions. Click the Services tab and verify that <service-name> v1.0 is listed in the table (the newly registered vSRX VM) along with the Security Director as the Service Manager, as shown in Figure 5.
Figure 5: Service Definitions Page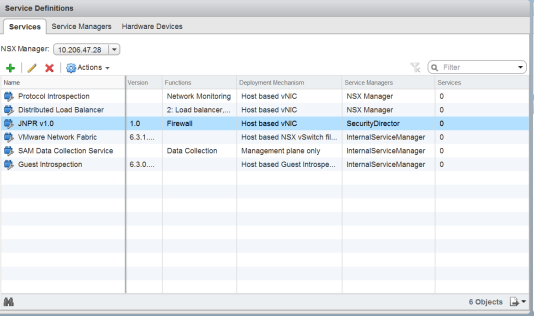
-
Click the Service Managers tab and verify that the Security Director is listed with a status of In Service, as shown in Figure 6.
Figure 6: vSphere Web Client Service Manager Page
The NSX Manager and its inventory are now synchronized with the Security Director. All shared objects (such as security groups) are synchronized between the NSX Manager and Security Director. The shared objects include the IP addresses of all VMs in ESXi hosts, including the vSRX agent VMs. Security Director creates a dynamic address group(DAG) for each security group synchronized from the NSX Manager, along with the addresses of each member of the security group.
After you register a Juniper security service in the NSX Manager, the NSX Manager uses the vSRX agent VM to communicate the service status. The NSX Manager transmits messages to the Security Director when any changes or activities are happening in the NSX Manager that are related to the Juniper security service.
Deploying vSRX as a Security Service on a vSphere Cluster (VMware vCenter Server)
The next step is to deploy the Juniper security service on a vSphere cluster. You perform this action as a new service deployment, selecting the Juniper security service and the specific vSphere cluster on which you want the vSRX agent VM deployed.
Before you deploy the vSRX agent VM as a security service on the vSphere cluster, you must create a static IP pool with a primary DNS for the vSRX. To create the static IP pool:
Create a static IP pool with a primary DNS for the vSRX. This is a mandatory step before you deploy the vSRX agent VM.
-
Click the Add icon (+) to add the static IP
pool.
The Add Static IP Pool page appears, as shown in Figure 7.
Figure 7: Add Static IP Pool Page
To deploy the vSRX agent VM as a security service for a vSphere cluster:
-
From the vSphere Web Client, click Networking & Security and then click Installation.
The Installation page appears.
-
Click the Service Deployments tab and then click the New Service Deployment (+) icon. The Deploy Network & Security Services page appears, as shown in Figure 8.
Figure 8: Deploy Network and Security Services Page
-
From the Select services & schedule page, select <service-name> v1.0 as the service to deploy and then click Next.
-
From the Select clusters page, select the data center and one or more clusters on which the vSRX agent VM is to be deployed, and then click Next.
-
From the Select storage and Management Network page:
-
Select the datastore on which to allocate shared storage for the vSRX agent VM, as shown in Figure 9. ESXi hosts should be configured so that they can access shared storage. If you select Specified on-host, ensure that the datastore for the ESXi host is specified in the Agent VM Settings of the ESXi host in the cluster. See the VMware documentation for details.
Figure 9: Select Storage and Management Network Page
-
Select the network that you intend to use for traffic to the vSRX agent VM. If you select Specified on-host, ensure that the network to be used is specified in the Agent VM Settings > Network property of the ESXi host in the cluster. See the VMware documentation for details.
Note:The datastore and network must be configured for each ESXi host in the cluster.
For IP assignment, you can choose an IP pool to assign a range of IP addresses from a selected static IP pool or create a new static IP pool.
-
-
Click Next to access the Ready to complete page, and then click Finish to publish the changes and deploy the vSRX agent VM security services to the specified cluster. From the Service Deployments tab, you will see that the Juniper security service has been successfully deployed on the selected vSphere cluster.
-
From the vSphere Web Client, click Hosts and Clusters and verify that vSRX agent VMs are listed as service-name v1.0 in the vSphere Web Client inventory and created for each ESXi host in the vSphere cluster.
Note:service-name is the name provided at the time of service registration.
-
The Security Director automatically discovers all the deployed vSRX VM agents by using the device-initiated discovery. A new firewall and IPS group policies are created and all devices are assigned to these group policies.
Note:The Security Director creates predefined IPS policies with a single IPS template. You can either add more IPS templates or convert the predefined IPS policies to custom IPS policies.
When you add an ESXi host in the vSphere cluster, NSX Manager automatically detects that the new ESXi host and adds the Juniper security service vSRX agent VM for it.
Verifying vSRX Agent VM Deployment in Security Director
In the Security Director, based on the NSX Manager discovery, NSX security groups are automatically synchronized with Security Director. For each service group in NSX Manager, Security Director creates a corresponding dynamic address group.
To verify that the vSRX agent VMs have been properly deployed:
-
Select Security Director > Monitor > NSX Inventory > Security Groups.
The Security Groups page appears listing all the security groups obtained from NSX and the corresponding dynamic address groups created by the Security Director, as shown in Figure 10.
Figure 10: Security Groups Page
-
Select Security Director > Monitor > vCenter Server Inventory > Virtual Machines.
The Virtual Machines page appears, listing the VMs that are dynamically fetched by the associated vCenter, as shown in Figure 11. You can view the security groups associated with each VM. Also, you can view security groups associated with each VM.
Figure 11: Virtual Machines Page
Automatic Creation of Security Policy in the NSX Environment to Direct Traffic Through the vSRX Agent VMs (VMware vCenter Server)
After you deploy vSRX agent VM security services to the ESXi hosts in a vSphere cluster, security policies are automatically created to redirect any network traffic originating from the VMs in a specific security group to the Juniper security service vSRX agent VM residing in the ESXi host for further analysis.
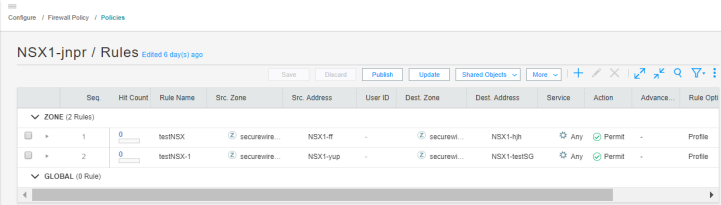
To direct the traffic to the vSRX agent VMs in each ESXi host by using the automatically created security policies:
-
On the Firewall and IPS Policies page, add new rules to
the automatically created firewall or IPS policies with respective
dynamic address groups, as shown in Figure 12. You can also use
the application firewalls in the firewall rules.
Figure 12: Firewall Policy Rules Page
-
After the firewall and IPS policies are successfully updated
in the Security Director, log in to the vSphere Web Client to verify
the security policies in NSX Manager.
Select Network & Security > NSX Managers, and the Navigator column, select the NSX Manager name. The security policies are automatically created in NSX Manager by Security Director, as shown Figure 13.
Figure 13: NSX Security Groups Page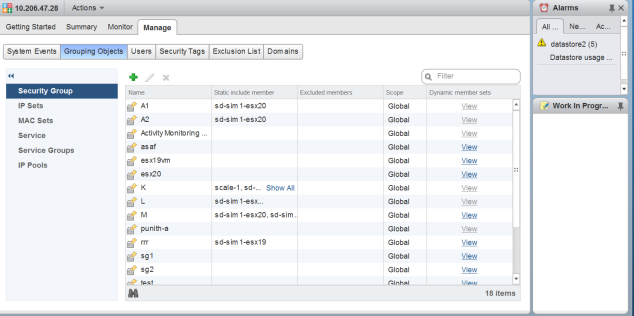
-
In the right pane, select the Partner Security Services
tab to view the complete list of automatically created security policies
from the Security Director, as shown in Figure 14.
Figure 14: Firewall Page

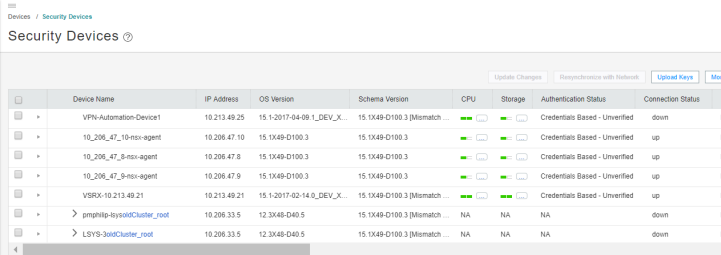
When you return to Security Director > Devices > Security Devices, you can view the active configuration for the vSRX agent VMs, as shown in Figure 15.
The NSX Manager is aware of the security groups that the Juniper security service monitors. If any changes occur in the security group, the NSX Manager notifies the Security Director about those changes. If membership changes, the NSX Manager notifies the Security Director of the changes and the Security Director updates its database based on the new membership.