Using Guided Setup for Juniper ATP Cloud with Juniper Connected Security
Guided Setup is the most efficient way to complete your Juniper ATP Cloud with Juniper Security configuration. To locate Guided Setup, navigate to Configure > Guided Setup > Threat Prevention in the Junos Space Security Director Portal.
Before You Begin
-
The ATP Cloud Configuration type you select on the Policy Enforcer Settings page determines the guided setup process. Guided setup provides all the configuration items you need for your chosen type. See Juniper ATP Cloud Configuration Type Overview for details on each configuration type.
-
Before you begin the guided setup process, you must enter the IP address and login credentials for the policy enforcer virtual machine on the Policy Enforcer Settings page. If you haven’t yet done that, go to Administration > Policy Enforcer > Settings and enter the necessary information. See Policy Enforcer Settings for more information.
-
Ensure that all the devices that you want to set up threat prevention for are already discovered and available on Junos Space. See Overview of Device Discovery in Security Director.
-
Ensure that you install the proper Schema that is suitable with the OS Version of the device.
-
Ensure that device version should not be less than 15.x.
-
Juniper ATP Cloud license and account are needed for all Juniper ATP Cloud Configuration Types. (Juniper ATP Cloud with Juniper Connected Security, Juniper ATP Cloud, and Cloud Feeds only). If you do not have a Juniper ATP Cloud license, contact your local sales office or Juniper Networks partner to place an order for a Juniper ATP Cloud premium or basic license. If you do not have a Juniper ATP Cloud account, when you configure Juniper ATP Cloud, you are redirected to the Juniper ATP Cloud server to create one. Please obtain a license before you try to create a Juniper ATP Cloud account. Refer to Obtaining a Juniper ATP Cloud License for instructions on obtaining a Juniper ATP Cloud license.
-
There are some concepts you should understand before you begin the configuration. We recommend that you read about them here in advance. Policy Enforcer Configuration Concepts.
This video provides a complete overview of how you can set up use Policy Enforcer threat prevention to block malicious servers and domains. You can refer to the procedure below for more elaborate instructions.
The Guided Setup process offers the following steps for configuring Juniper ATP Cloud with Juniper Connected Security threat prevention.
-
Navigate to the Guided Setup page from the Configuration > Guided Setup > Threat Prevention menu.
The Threat Prevention Policy Setup page appears as shown in Figure 1.
Figure 1: Threat Presentation Guided Setup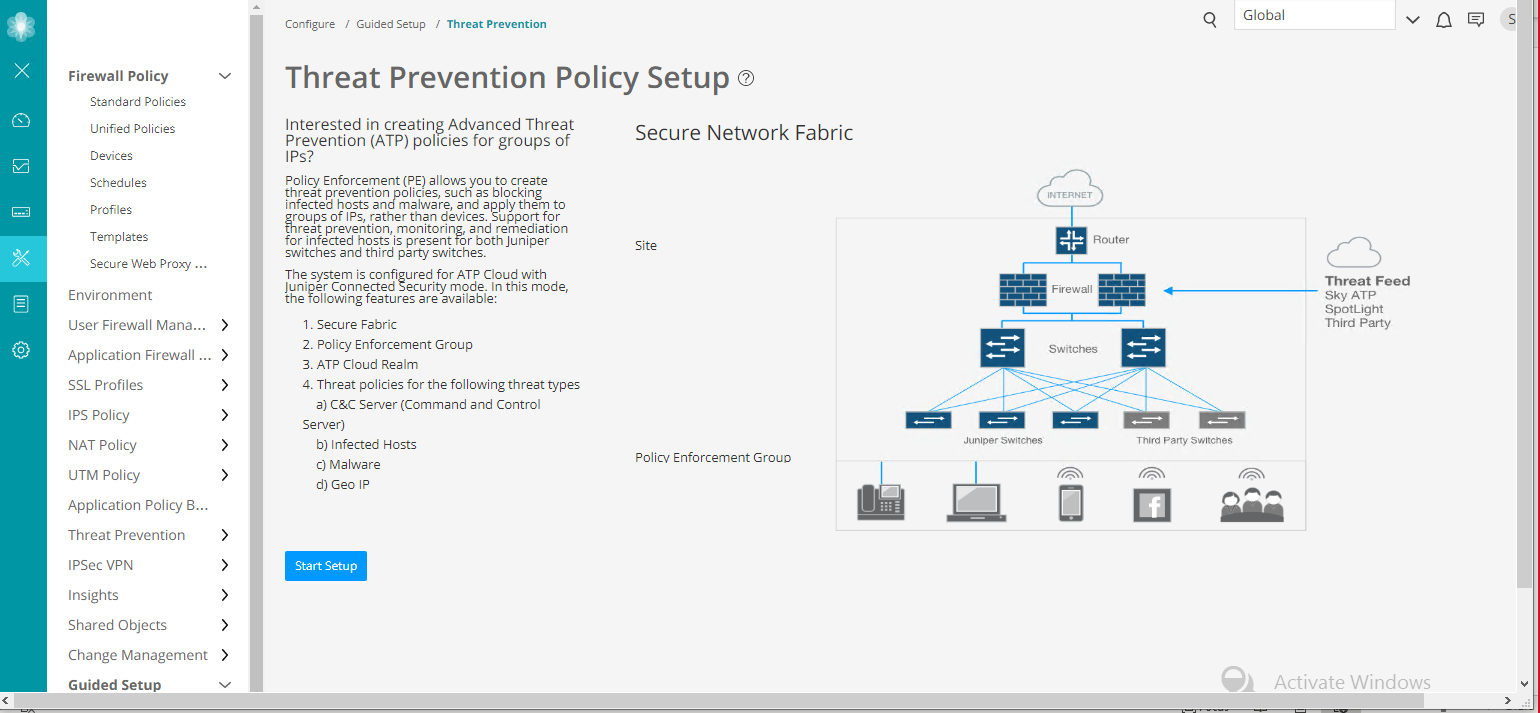
-
Click Start Setup to begin the guided setup.
The guided setup takes you through the various configuration, the first being Tenants, as shown in Figure 2.
-
Note:
This step is not applicable for SRX Series devices. Tenants are only applicable for MX Series devices.
Create a tenant representing an enterprise by clicking + on the top-right corner of the page. The Create Tenant page appears.
Use the instructions provided in section Create Secure Fabric Tenants to create a tenant.
Note:When a tenant is created, a VRF instance is assigned to the tenant. When a site is associated with this tenant, only those devices that have the VRF instance associated with the tenant can be added to the site.
Click OK to move on to the next step.
The Secure Fabric page appears.
Note:In Policy Enforcer Release 20.1R1, only MX series devices support LSYS and VRF. Also, only root-logical system is supported. All the sites of a realm are either with tenants or without tenants.
Figure 2: Threat Prevention Configuration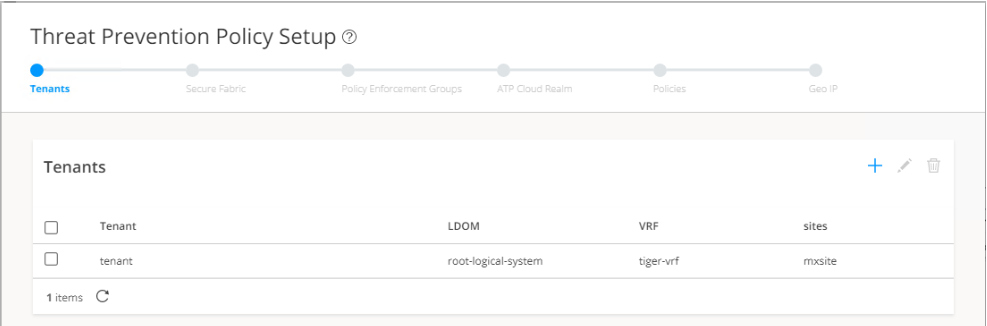
-
A Secure Fabric is a collection of network devices (switches, routers, firewalls, and other security devices), used by users or user groups, to which policies for aggregated threat prevention are applied. Create a Secure Fabric by clicking + on the top-right corner of the page. The Create Site page appears.
Use the instructions provided in section Creating Secure Fabric and Sites to create a site.
After you create a site, you must add the devices for which you want to apply a common security policy, to the site. To do so, click Add Enforcement Points in the Enforcement Points column of a device or, alternately select a device and click Add Enforcement Points on the top-right corner of the page. Use the instructions provided in section Adding Enforcement Points to add endpoints to the site.
Note:-
A device can belong to only one site and you must remove it from any other site where it is used.
-
Firewall devices are automatically enrolled with ATP Cloud as part of this step. No manual enrollment is required.
You can find the newly created Secure Fabric on the Devices page.
Click OK to move on to the next step.
The Policy Enforcement Group page appears.
-
-
A policy enforcement group is a grouping of endpoints ready to receive advance threat prevention policies. Create a policy enforcement group by clicking + on the top-right corner of the page. The Policy Enforcement Group page appears.
Use the instructions provided in section Creating Policy Enforcement Groups to create a policy enforcement group.
You can find the newly created policy enforcement group on the Configure > Shared Objects page.
Click OK to move on to the next step.
The ATP Cloud Realm page appears.
-
A security realm is a group identifier for an organization used to restrict access to Web applications. You can create one or multiple realms. If you have not created a realm from within your ATP Cloud account, you can create and register it here by clicking the + sign on the top-right corner of the page.
Use the instructions provided in section Creating Juniper ATP Cloud Realms and Enrolling Devices or Associating Sites to create and register a realm, and then enroll SRX Series devices into the realm.
If a realm is already created with a site assigned, all devices in a site are listed under the Devices in Site(s) column that includes EX Series, SRX Series, all enforcement points, and devices that are originally from a realm. Devices that are marked as perimeter firewall devices are listed under the Perimeter Firewall column.
Click OK to move on to the next step.
The Threat Prevention Policy page appears.
-
Create a threat prevention policy by clicking + on the top-right corner of the page. The Create Threat Prevention Policy page appears.
Use the instructions provided in section Creating Threat Prevention Policies to create a threat prevention policy.
The newly created threat prevention policy is available on page Configure > Threat Prevention > Policies.
Click OK to move on to the next step.
The Geo IP page appears.
-
(Optional) Geo IP refers to the method of locating a computer terminal's geographic location by identifying that terminal's IP address. A Geo IP feed is an up-to-date mapping of IP addresses to geographical regions. By mapping IP address to the sources of attack traffic, the geographic regions of origin can be determined, giving you the ability to filter traffic to and from specific locations in the world. Create a Geo IP by clicking + on the top-right corner of the page. The Create Geo IP page appears as shown in Figure 3.
Use the instructions provided in section Creating Geo IP Policies to create a Geo IP.
Click Finish to move on to the Summary page.
The Geo IP page appears.
Figure 3: Create Geo IP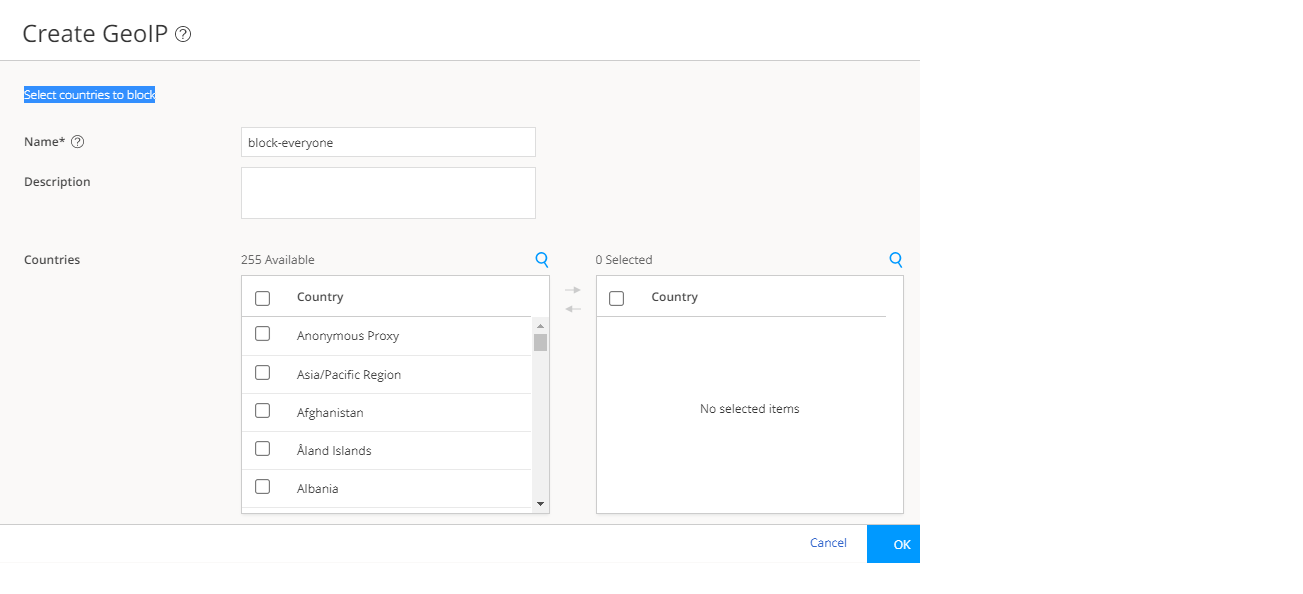
-
The last page is a summary of the parameters you have configured using quick setup. Click OK to create the threat prevention policy. The Policies page appears with the newly created policy listed.
-
You must apply your new or edited policy configuration to Policy Enforcer in order for the policy configuration to go live. In order to do that, click the Ready to Update link in the Status column. The Threat Policy Analysis page appears.
Use the Threat Policy Analysis page to view your pending policy changes in chronological order. Click the View Analysis link to view the changes.
In the Action section, you can choose to: Update now to , Update later, or Save the changes without updating.
-
Update now—Apply the policy configuration immediately.
-
Update later—Apply the policy configuration at a scheduled date and time of your choice.
-
Save the changes without updating—Save the policy changes without applying them to Policy Enforcer.
-