- play_arrow Getting Started
- play_arrow Blueprints
- play_arrow Blueprint Analytics
- What are Blueprint Analytics
- play_arrow Dashboards
- What are Blueprint Analytics Dashboards
- Configure Auto-Enabled Blueprint Analytics Dashboards
- Instantiate Predefined Blueprint Analytics Dashboard
- Create Blueprint Analytics Dashboard
- Export Blueprint Analytics Dashboard
- Import Blueprint Analytics Dashboard
- Update Blueprint Analytics Dashboard
- Delete Blueprint Analytics Dashboard
- play_arrow Anomalies
- play_arrow Probes
- play_arrow Predefined Reports
- play_arrow Root Causes
- play_arrow Staged Datacenter Blueprints
- play_arrow Physical
- play_arrow Build
- play_arrow Topology
- play_arrow Nodes
- Nodes (Datacenter)
- Create Access Switch
- Delete Node
- Update Deploy Mode (Datacenter)
- Unassign Device (Datacenter)
- Execute CLI Show Command (Data Center Blueprint)
- play_arrow Change Hostnames / Names
- Change Assigned Interface Map
- Change Assigned ASN (Datacenter)
- Change Assigned Loopback IP Address (Datacenter)
- Edit Device Properties (Datacenter)
- Update Port Channel ID Range
- View Node's Static Routes
- Update Tags on Node (Datacenter)
- play_arrow Generic Systems (Internal/External)
- play_arrow Links
- Links (Datacenter)
- play_arrow Add Links
- play_arrow Cabling Map
- play_arrow Link Speeds
- play_arrow LAG
- Update Tags on Link (Datacenter)
- Change Assigned Link IP Addresses (Datacenter)
- Update Link Properties
- Fetch LLDP Data (Datacenter)
- Delete Link (Datacenter)
- play_arrow Interfaces
- play_arrow Racks
- play_arrow Pods
- play_arrow Planes
-
- play_arrow Virtual
- play_arrow Virtual Networks
- What are Virtual Networks
- Create Virtual Network
- Update Virtual Network Resource Assignments
- Reset Virtual Network Resource Group Override
- Import Virtual Network
- Export Virtual Network to CSV File
- Update Virtual Network Assignments
- Move Virtual Network to Different Routing Zone
- Update Virtual Network Tags
- Change Virtual Network Description
- Change Virtual Network Details
- Delete Virtual Network
- play_arrow Routing Zones
- play_arrow Static Routes
- play_arrow Protocol Sessions
- play_arrow Virtual Infrastructure
-
- play_arrow Policies
- play_arrow Endpoints
- play_arrow Security Policies
- play_arrow Interface Policies
- play_arrow Routing Policies
- play_arrow Routing Zone Constraints
- play_arrow Tenants
-
- play_arrow Data Center Interconnect (DCI)
- play_arrow Integrated Interconnect
- play_arrow Over the Top or External Gateways
- play_arrow Settings
- Update ESI MAC msb
-
- play_arrow Catalog
- play_arrow Logical Devices
- play_arrow Interface Maps
- play_arrow Property Sets
- play_arrow Configlets
- play_arrow AAA Servers
- play_arrow Tags
-
- play_arrow Tasks
- play_arrow Connectivity Templates
- Connectivity Templates Introduction
- play_arrow Primitives
- Primitive: Virtual Network (Single)
- Primitive: Virtual Network (Multiple)
- Primitive: IP Link
- Primitive: Static Route
- Primitive: Custom Static Route
- Primitive: BGP Peering (IP Endpoint)
- Primitive: BGP Peering (Generic System)
- Primitive: Dynamic BGP Peering
- Primitive: Routing Policy
- Primitive: Routing Zone Constraint
- User-defined
- Pre-defined
- Create Connectivity Template for Multiple VNs on Same Interface (Example)
- Create Connectivity Template for Layer 2 Connected External Router (Example)
- Update Connectivity Template Assignments
- Add / Remove Tags on Connectivity Template
- Update Connectivity Template
- Delete Connectivity Template
- play_arrow Fabric Settings
- play_arrow Fabric Policy
- play_arrow Severity Preferences
-
-
- play_arrow Staged Freeform Blueprints
- Freeform Introduction
- play_arrow Blueprints
- play_arrow Physical
- play_arrow Selection
- play_arrow Topology
- play_arrow Systems
- Systems Introduction (Freeform)
- Create Internal System (Freeform)
- Create External System (Freeform)
- Update Assigned Config Template(Freeform)
- Update System Name (Freeform)
- Update Hostname (Freeform)
- Change Assigned Device Profile (Freeform)
- Update System ID Assignment (Freeform)
- Update Deploy Mode (Freeform)
- Add / Remove Tags on System (Freeform)
- Delete System (Freeform)
- Device Context (Freeform)
- play_arrow Links
-
- play_arrow Resource Management
- Resource Management Introduction (Freeform)
- play_arrow Blueprint Resources
- play_arrow Allocation Groups
- play_arrow Local Pools
- play_arrow Catalog (Freeform)
- play_arrow Config Templates
- play_arrow Device Profiles
- play_arrow Property Sets
- play_arrow Tags
-
- play_arrow Tasks
- play_arrow Uncommitted Blueprints
- play_arrow Active Datacenter Blueprints
- play_arrow Time Voyager (Blueprints)
- play_arrow Design
- play_arrow Logical Devices
- play_arrow Interface Maps
- play_arrow Rack Types
- play_arrow Templates
- play_arrow Config Templates (Freeform)
- play_arrow Configlets (Datacenter)
- play_arrow Property Sets (Datacenter)
- play_arrow TCP/UDP Ports
- play_arrow Tags
-
- play_arrow Resources
- play_arrow Analytics - Telemetry
- play_arrow Analytics - Flow
- play_arrow Apstra Flow Overview
- play_arrow Dashboards
- play_arrow Supported Flow Records
- play_arrow Flow Enrichment
- play_arrow Monitor Apstra Flow
- play_arrow Configuration Reference
- play_arrow API
- play_arrow Additional Documentation
- play_arrow Knowledge Base
-
- play_arrow Analytics - Exploratory Analytics
- play_arrow External Systems (RBAC Providers)
- play_arrow Providers
- play_arrow Provider Role Mapping
-
- play_arrow Platform
- play_arrow User Management
- play_arrow Security
- play_arrow External Services
- play_arrow Streaming
- Event Log (Audit Log)
- Licenses
- play_arrow Apstra VM Clusters
- play_arrow Developers
- play_arrow Technical Support
- Check Apstra Versions and Patent Numbers
-
- play_arrow Favorites & User
- play_arrow Apstra Server Management
- Apstra Server Introduction
- Monitor Apstra Server via CLI
- Restart Apstra Server
- Reset Apstra Server VM Password
- Reinstall Apstra Server
- Apstra Database Overview
- Back up Apstra Database
- Restore Apstra Database
- Reset Apstra Database
- Migrate Apstra Database
- Replace SSL Certificate on Apstra Server with Signed One
- Replace SSL Certificate on Apstra Server with Self-Signed One
- Change Apstra Server Hostname
- FIPS 140-2 Support
- play_arrow Apstra CLI Utility
- play_arrow Guides
- play_arrow References
- play_arrow Feature Matrix
- play_arrow Devices
- play_arrow Blueprint Analytics
- play_arrow Predefined Dashboards
- play_arrow Predefined Probes
- BGP Monitoring Probe
- Probe: Bandwidth Utilization
- Probe: Critical Services: Utilization, Trending, Alerting
- Probe: Device Environmental Checks
- Probe: Device System Health
- Probe: Device Telemetry Health
- Probe: Device Traffic
- Probe: Drain Traffic Anomaly
- Probe: ECMP Imbalance (External Interfaces)
- Probe: ECMP Imbalance (Fabric Interfaces)
- Probe: ECMP Imbalance (Spine to Superspine Interfaces)
- Probe: ESI Imbalance
- Probe: EVPN Host Flapping
- Probe: EVPN VXLAN Type-3 Route Validation
- Probe: EVPN VXLAN Type-5 Route Validation
- Probe: External Routes
- Probe: Hot/Cold Interface Counters (Fabric Interfaces)
- Probe: Hot/Cold Interface Counters (Specific Interfaces)
- Probe: Hot/Cold Interface Counters (Spine to Superspine Interfaces)
- Probe: Hypervisor and Fabric LAG Config Mismatch Probe (Virtual Infra)
- Hypervisor and Fabric VLAN Config Mismatch Probe
- Probe: Hypervisor MTU Mismatch Probe (Virtual Infra - NSX-T Only)
- Probe: Hypervisor MTU Threshold Check Probe (Virtual Infra)
- Probe: Hypervisor Missing LLDP Config Probe (Virtual Infra)
- Probe: Hypervisor Redundancy Checks Probe (Virtual Infra)
- Probe: Interface Flapping (Fabric Interfaces)
- Probe: Interface Flapping (Specific Interfaces)
- Probe: Interface Policy 802.1x
- Probe: LAG Imbalance
- Probe: Leafs Hosting Critical Services: Utilization, Trending, Alerting
- Probe: Link Fault Tolerance in Leaf and Access LAGs
- Probe: MAC Monitor
- Probe: MLAG Imbalance
- Probe: Multiagent Detector
- Probe: Optical Transceivers
- Probe: Packet Discard Percentage
- Probe: Spine Fault Tolerance
- Probe: Total East/West Traffic
- Probe: VMs without Fabric Configured VLANs Probe (Virtual Infra)
- Probe: VXLAN Flood List Validation
- play_arrow Probe Processors
- Processor: Accumulate
- Processor: Average
- Processor: BGP Session
- Processor: Comparison
- Processor: Environment
- Processor: EVPN Type 3
- Processor: EVPN Type 5
- Processor: Extensible Service Collector
- Processor: Generic Graph Collector
- Processor: Generic Service Data Collector
- Processor: Interface Counters
- Processor: Logical Operator
- Processor: MAC
- Processor: Match Count
- Processor: Match Percentage
- Processor: Match String
- Processor: Max
- Processor: Min
- Processor: Optical Threshold
- Processor: Optical Xcvr
- Processor: Periodic Average
- Processor: Periodic Change
- Processor: Range
- Processor: Ratio
- Processor: Service Collector
- Processor: Set Comparison
- Processor: Set Count
- Processor: Standard Deviation
- Processor: State
- Processor: Subtract
- Processor: Sum
- Processor: System Utilization
- Processor: Telemetry Service Health
- Processor: Time in State
- Processor: Traffic Monitor
- Processor: Union
- Processor: VXLAN Floodlist
- Configlet Examples (Design)
- Apstra EVPN Support Addendum
- Apstra Server Configuration File
- Graph
- Juniper Apstra Tech Previews
-
Onboard Devices with Apstra ZTP
Apstra ZTP manages the bootstrap and lifecycle of devices managed by Apstra.
Before onboarding devices, make sure that your devices are set to factory default. Different vendors have different methods for setting their devices back to factory default after having added configuration.
To prevent being locked out of a device when there is a problem during the ZTP process, ZTP uses default, hard-coded credentials. These credentials are:
- root / admin
- aosadmin / aosadmin
Juniper Junos
EX switches require Junos OS version 21.2 or higher. EX switches using Junos OS versions below 21.1 are missing the Python module that's required for ZTP.
- Juniper Devices Minimum Resource Requirements
- Juniper Junos Bootstrap File
- Restart Juniper Junos ZTP
- Troubleshoot Juniper Junos ZTP
- Requirements for 4.2.0 [DOCS-1013]
Juniper Devices Minimum Resource Requirements
Apstra ZTP uses a custom script to create offbox agents, create local users and set other system configuration. The ZTP process copies a new OS image to the switch. Before installing Apstra ZTP, ensure that the switch has sufficient disk space for the OS image.
root@leaf001-001-2> show system storage Filesystem Size Used Avail Capacity Mounted on /dev/gpt/junos 6.0G 1.0G 4.5G 18% /.mount <...>
Juniper Junos Bootstrap File
Apstra ZTP uses a Python script to provision the device during ZTP. To allow the Python
script (ztp.py
) to run on a device that is not Junos OS Evolved,
additional configuration is required. Use the
junos_apstra_ztp_bootstrap.sh
script to bootstrap Apstra ZTP on Junos.
It downloads and runs the ZTP script.
Junos OS Evolved devices don't require this bootstrap; they run the Apstra ZTP python script (ztp.py) directly.
Restart Juniper Junos ZTP
To erase (zeroize) the device and restart Juniper Junos ZTP process:
root@leaf3> request system zeroize
Troubleshoot Juniper Junos ZTP
When in ZTP mode, the Juniper switch downloads the ztp.py
and
ztp.json
files to the /var/preserve/apstra
directory.
For diagnostics, take note of the /var/preserve/apstra/aosztp.log
file.
You can find additional useful messages in /var/log/messages
(search for
'ztp').
Requirements for 4.2.0 [DOCS-1013]
In ztp.json , system-agent-params, If you need to provide “profile” parameters, you must use UUID instead of the profile name/label.
In ztp.json , system-agent-params, the following additional params are always visible in the ZTP server, however these will cause agent creation failure during the ZTP process.
The parameters are force_package_install, install_requirements, enable_monitor
These must be removed from the system-agent-params for agent creation to work via ZTP, howver due to a bug when these parameters are removed from the UI ztp.json file, they are no removed and configurator add them again. The only solution is to manually modify the ztp.json file by logging via SSH connection to ZTP server, and then restarting the tftp container.
Enterprise SONiC
Enterprise SONiC Devices Minimum Resource Requirements
Apstra ZTP 4.2 used with Apstra version 4.2 has support for SONiC Enterprise Distribution devices. SONiC devices with earlier versions of Apstra ZTP, or the software, are not supported.
Apstra ZTP uses a custom script to create onbox agents, create local users and set other system configuration.
As part of the ZTP process a new OS image is copied to the switch. Before installing Apstra ZTP ensure that the switch has sufficient disk space for the OS image.
If you're using ONIE to install Enterprise SONiC on a device, you must copy the image
to the /containers_data/tftp
directory and rename it to
onie-installer
or another ONIE download name
(onie-installer-x86_64-dell_z9100_c2538-r0
for example). When
rebooting in ONIE, the device searches for this file on the HTTP then TFTP server. If it
doesn't find the file, then ZTP fails. Once ONIE SONiC installation successfully
completes, the SONiC device starts ZTP automatically.
To restart the SONiC ZTP process, use the sudo ztp enable
and
sudo ztp run
commands.
admin@sonic:~$ sudo ztp enable admin@sonic:~$ sudo ztp run ZTP will be restarted. You may lose switch data and connectivity, continue?[yes/NO] yes admin@sonic:~$
Cisco NX-OS
Cisco NX-OS Devices Minimum Resource Requirements
Ensure that sufficient disk space is available on the switch. As part of the ZTP process a new OS image is copied to the switch. Before installing Apstra ZTP ensure that the switch has sufficient disk space for the OS image.
switch1# dir bootflash: | include free|total 1296171008 bytes free 3537219584 bytes total
Restart Cisco NX-OS ZTP
If an agent is already installed on the device, before you restart the device ZTP process remove the agent either via the UI device agent installer or manually via the device CLI.
C9K-172-20-65-5# guestshell destroy Remove remaining AOS data from system Removing the guest-shell deletes most of the data left by AOS. Some files are still on the bootflash:/.aos folder. C9K-172-20-65-5# delete bootflash:.aos no-prompt
To restart Cisco NX-OS ZTP process:
switch# write erase switch# reload
Arista EOS
Arista EOS Devices Minimum Resource Requirements
Apstra ZTP has limited support and known issues for virtual Arista EOS (vEOS) devices.
- ZTP EOS upgrades are not supported on vEOS devices. EOS versions for vEOS device
must match
eos-versions
set inztp.json
file. - ZTP Logging to the controller does not work for vEOS devices due to the lack of a device serial number. This will be addressed in a future version.
As part of the ZTP process, a new OS image is copied to the switch. Before installing Apstra ZTP ensure that the switch has sufficient disk space for the OS image.
switch1#dir flash: Directory of flash:/ <...> 3957878784 bytes total (3074723840 bytes free)
Restart Arista EOS ZTP
If an agent is already installed on the device, before you restart the device ZTP process, remove the agent extension either via the UI Device Agent Installer or manually via the device CLI.
l2-virtual-001-leaf1#sho extensions Name Version/Release Status Extension ----------------------------------------- ------------------ --------- --------- aos-device-agent-3.1.0-0.1.205.i386.rpm 3.1.0/0.1.205 A, I 1 A: available | NA: not available | I: installed | NI: not installed | F: forced l2-virtual-001-leaf1#delete extension:aos-device-agent-3.1.0-0.1.205.i386.rpm l2-virtual-001-leaf1#no extension aos-device-agent-3.1.0-0.1.205.i386.rpm l2-virtual-001-leaf1#copy installed-extensions boot-extensions Copy completed successfully. l2-virtual-001-leaf1#delete /recursive flash:aos* l2-virtual-001-leaf1#
To restart Arista EOS ZTP process:
localhost# delete flash:zerotouch-config localhost# write erase Proceed with erasing startup configuration? [confirm]y localhost# reload
Monitor Onboarding Status
When executed, the ZTP script sends logs to the Apstra server via API. You can monitor the
ZTP process from the Apstra GUI. From the left navigation menu, navigate to
Devices > ZTP Status > Devices.
Each device that's interacting with DHCP and ZTP is listed here along with its System ID
(serial number) if known, ZTP Status, ZTP Latest Event and the date and time the device
status was last updated. To see the full DHCP and ZTP log for the device, click the "Show
Log" button (the eye in the Actions panel).
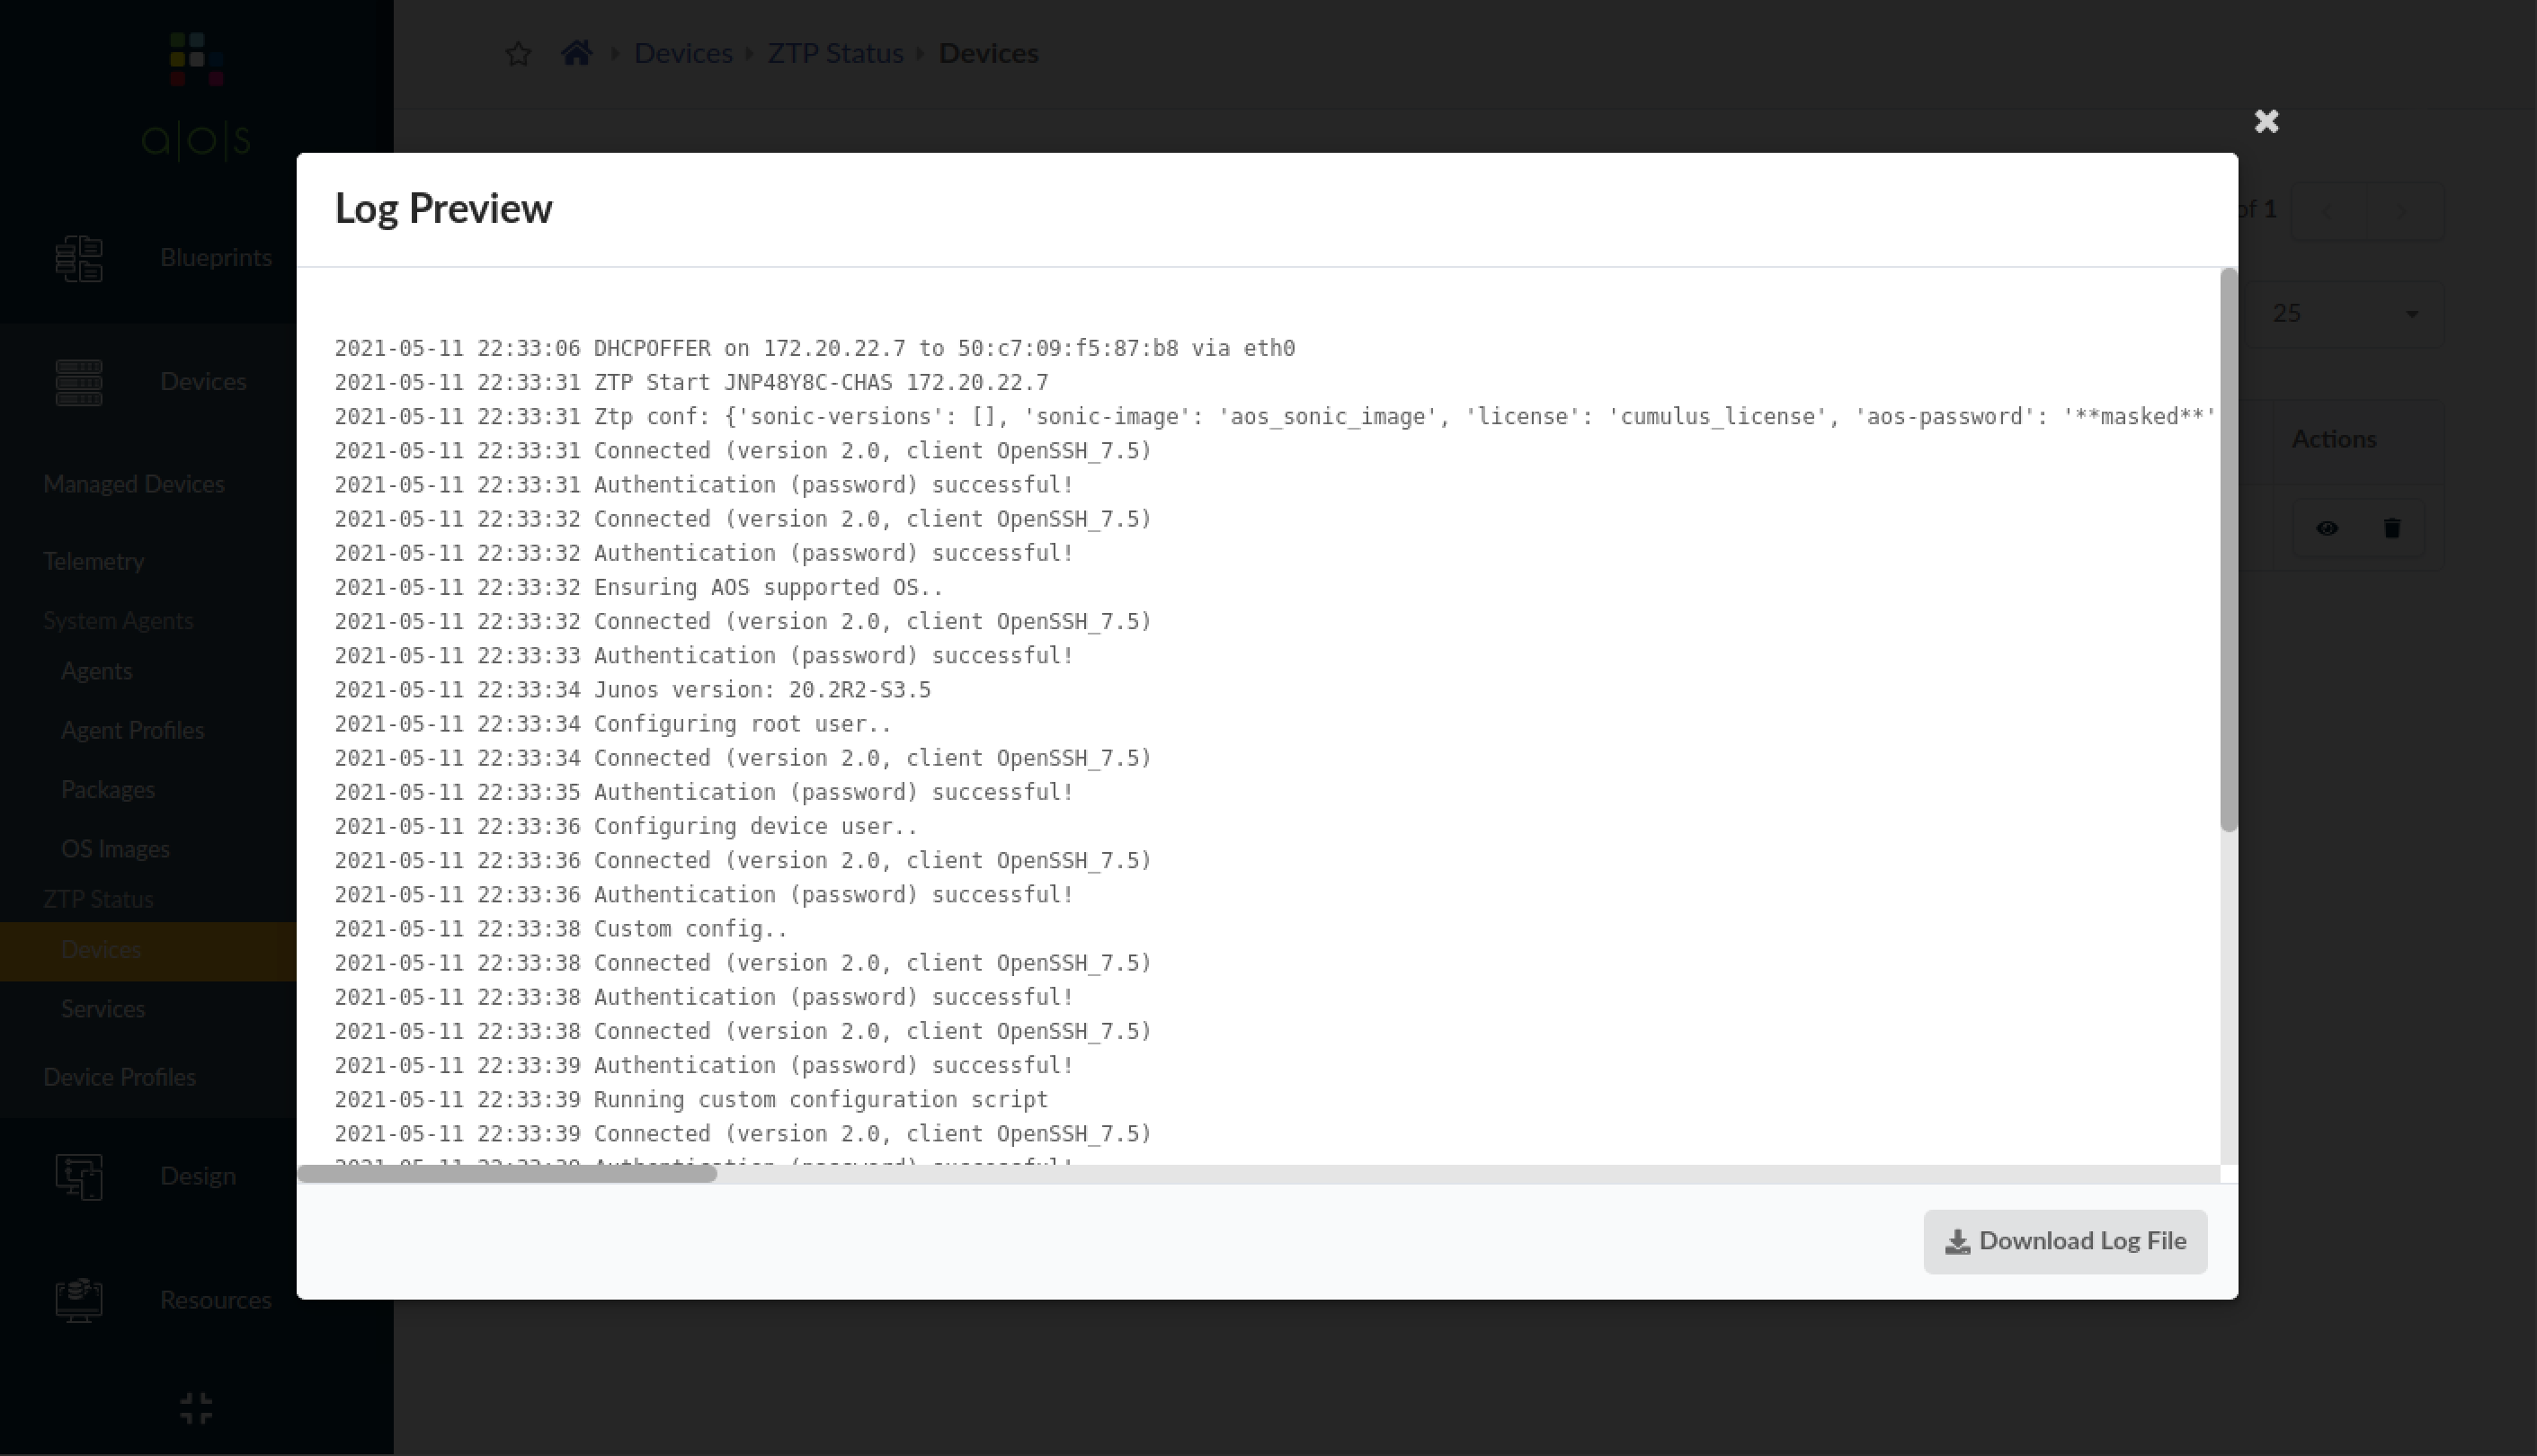
You can download the log file. If you don't need the logs for a device anymore, click the
Delete button. Log files for all processes are retained in the
/containers_data/logs
directory.
When the ZTP process successfully onboards a device it's included in the Managed Devices page, ready to be acknowledged and assigned to a blueprint. Navigate to Devices > Managed Devices to see available devices.