Juniper AP Ports and Their Usage
Use the information in this topic to learn about the ports available on the Juniper access points (APs) and determine how to use them in your network.
Table 1 lists the ports available on the Juniper access point (AP) models.
|
Wireless Standard |
AP Model |
Ports |
|
|---|---|---|---|
|
Ethernet |
IoT |
||
|
Wi-Fi 7 |
AP47 |
Eth0: PoE 802.3bt in + data in Eth1: PoE 802.3bt in + data in |
– |
|
Wi-Fi 6E |
AP24 |
Eth0: PoE 802.3at in + data in |
– |
|
AP34 |
Eth0: PoE 802.3at in + data in |
– |
|
|
AP45 |
Eth0: PoE 802.3bt in + data in Eth1: Data out If the Eth0 port is connected to 802.3bt power, the Eth1 port can operate as a PoE power sourcing equipment (PSE) providing up to 15.4 W power. |
– |
|
| AP64 |
Eth0: PoE 802.3at/802.3bt in + data in |
– |
|
|
Wi-Fi 6 |
AP12 |
Eth0: PoE 802.3at in + data in Eth1: Data out If the Eth0 port is connected to 802.3at power, the Eth1 port can operate as a PoE power sourcing equipment (PSE) providing up to 7 W power. Eth2 and Eth3: Data out |
– |
|
AP32 |
Eth0: PoE 802.3at in + data in Eth1: Data out |
– |
|
|
AP33 |
Eth0: PoE 802.3at in + data in Eth1: Data out |
– |
|
|
AP43 |
Eth0: PoE 802.3at in + data in Eth1: Data Out If the Eth0 port is connected to 802.3bt power, the Eth1 port can operate as a PoE power sourcing equipment (PSE) providing up to 15.4 W power. |
Supports digital inputs (0 to +5V), digital outputs (0 to +5V), and analog inputs (0 to +5V) |
|
|
AP63 |
Eth0: PoE 802.3at in + data in Eth1: Data out If the Eth0 port is connected to 802.3bt power, the Eth1 port can operate as a PoE power sourcing equipment (PSE) providing up to 15.4 W power. |
– |
|
|
Wi-Fi 5 |
AP21 |
Eth0: PoE 802.3at in + data in Eth1: Data Out If the PoE Passthrough feature is enabled, the Eth1 port can provide PoE out. Note:
The Eth1 port is typically used to connect to the AP21 but it can also be used to obtain Ethernet access. You'll need to disable PoE Passthrough on the AP before connecting the device to the Eth1 port. |
– |
|
AP41 |
Eth0: PoE 802.3at in + data in Eth1: Data out |
Supports digital inputs (0 to +5V), digital outputs (0 to +5V), and analog inputs (0 to +5V) |
|
|
AP61 |
Eth0: PoE 802.3at in + data in Eth1: Data out The Eth1 port does not support PoE out. |
– |
|
| Other |
BT11 |
Eth0: PoE 802.3at in + data in Eth1: Data out If the PoE Passthrough feature is enabled, the Eth1 port can provide PoE out. Note:
The Eth1 port is typically used to connect to the BT11 but it can also be used to obtain Ethernet access. You'll need to disable PoE Passthrough on the AP before connecting the device to the Eth1 port. |
– |
IoT Port Pins
The IoT port on the AP41 and AP43 contains 8 pins:
-
2 digital IN pins that you can use only as input
-
1 digital OUT pin
-
4 analog pins that you can use for both input and output
-
1 ground pin
The following figure shows the IoT port connector that you can connect to the IoT port on the AP.
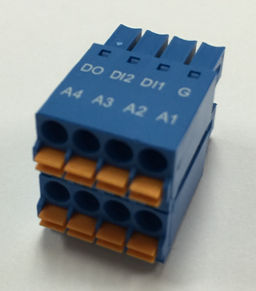
|
Pin |
Function |
|---|---|
|
DO |
Digital output |
|
DI2 |
Digital input 2 |
|
DI1 |
Digital input 1 |
|
G |
Ground |
|
A4 |
Analog input 4 |
|
A3 |
Analog input 3 |
|
A2 |
Analog input 2 |
|
A1 |
Analog input 1 |
How to Enable the IoT Port
Use the following API call to enable the IoT port. The iot_config attribute provides information about the status of the pins on the IoT port.
PUT : https://api.mist.com/api/v1/sites/:site_id/devices/:device_id
{

"iot_config": {

   "DO": {

      "enabled": true,

      "value": <0 == OFF; 1 == ON>

      }

   }

}Ensure that you configure the SSID for 2.4 GHz or dual band; otherwise, the IoT devices will not detect any SSID or WLAN,
You can view the current state of the IoT port pins by using the following API call:
GET /api/v1/sites/:site_id/devices/:device_id/iot
You can view the AP statistics for a site by using the following API call:
GET /api/v1/sites/:site_id/stats/devices
The API output also includes the information from the integrated sensors as shown in the example below:
GET /api/v1/sites/:site_id/stats/devices  // Environment stats
“env_stat”: {
“cpu_temp”: 51,
“ambient_temp”: 39,
“humidity”: 11,
“attitude”: 0,
“pressure”: 1015
“accel_x”: -0.012,
“accel_y”: 0.004,
“accel_z”: -1.012,
“magne_x”: 0.0,
“magne_y”: 1.3,
“magne_z”: 0.0,
“vcore_volatge”: 0
},