ON THIS PAGE
Configure Ethernet Settings in a Device Profile
Although you typically won't need to configure the Ethernet ports for your Juniper Mist access points (APs), when needed you can enable features such as PoE passthrough and enable or disable interfaces.
The Ethernet ports on Juniper Mist Access Points (APs) generally require no extra configuration, especially for wireless-only use cases. The cloud automatically ensures the correct VLANs are plumbed to the AP Ethernet ports auto-learned from the configured WLANs.
The most common use case for modifying the AP’s Ethernet port configurations is when you want to use the AP’s secondary Ethernet interface(s) for connecting downstream wired devices to the AP.
You can configure AP-specific Ethernet settings. This includes wireless clients connecting through the AP. Alternatively, you can create a device profile with the desired configurations and apply them to a group of APs all at once. If there are conflicting configurations between the individual AP settings and the device profile, the individual settings will prevail unless you disable the Override Profile option on the AP configuration page.
PoE Passthrough
Most Juniper APs can act as a Power Sourcing Equipment (PSE), allowing them to provide Power over Ethernet (PoE) to devices connected to Eth1 on the AP. However, model-specific considerations might apply. If you have supported devices that are connected to a PoE-enabled switch port, you can enable the PoE Passthrough option to extend power from the AP to the enabled Ethernet ports and/or the module port. For example, you can use the PoE Passthrough option to support daisy chaining of multiple BT11s. See Daisy Chain BT11 Access Points.
On both the AP41 and AP61, the module port provides PSE functionality. This allows for convenient power distribution to compatible devices.
Configuration Steps
To configure the Ethernet ports for APs attached to a device profile:
From the Mist portal, click Organization > Device Profiles and scroll down to the Ethernet Properties section.
Note:You can also configure the settings for an individual AP. From the Mist portal, click Access Points, click an AP, and scroll down to the Ethernet Properties section in the AP configuration page.
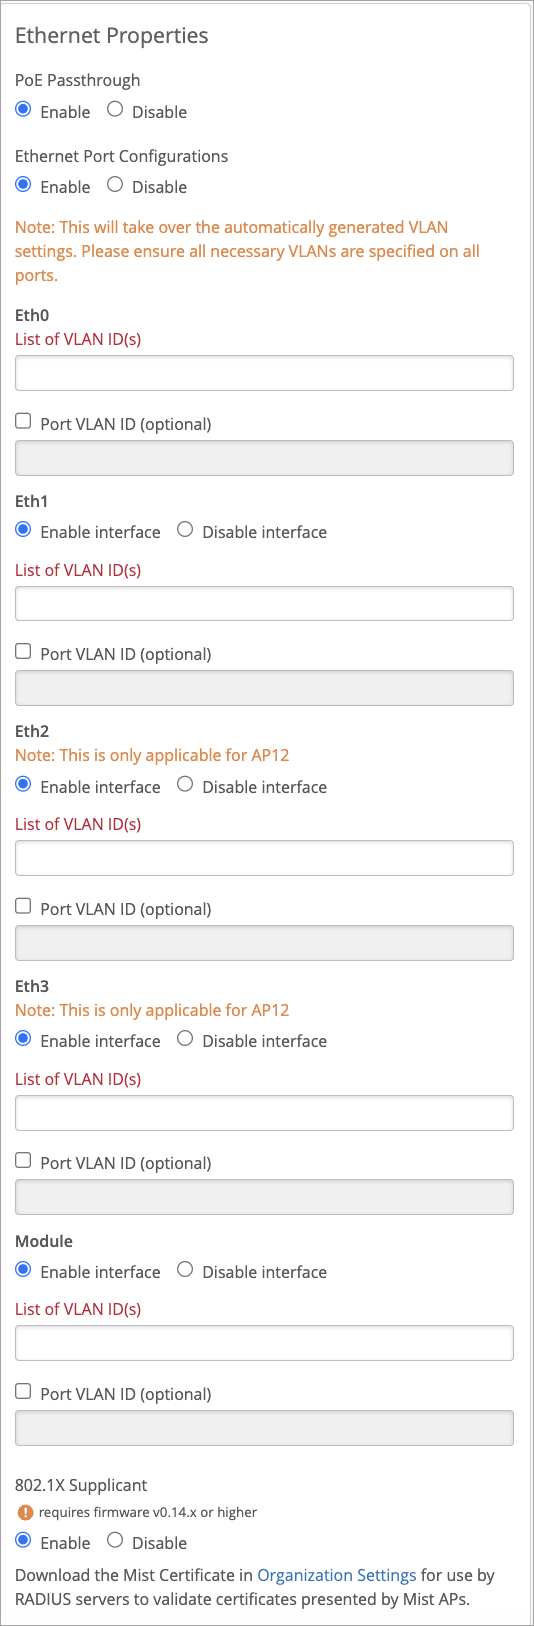
- Enable PoE Passthrough if you want to extend power from an AP to its enabled Ethernet ports.
Configure the Ethernet ports. Note that the VLAN settings configured here take precedence over those made in the IP Address section for VLAN ID, at both the device profile and individual AP level.
- List of VLAN IDs (Eth0 port)—Specify the VLANs that the AP can connect to through its Eth0 connection to the switch. Recall that Eth0 traffic is comprised of both AP management packets, and wireless client data packets. Use this configuration when you want to explicitly control the active VLANs on the AP switch port. For example, if you are adding extra VLANs for the wired ports on an AP12 that are not included in the WLAN VLANs.
Port VLAN IDs—This is the untagged VLAN on the port. Normally you should enter VLAN 1, unless you specify management VLAN in the IP Address section.
List of VLAN IDs (Eth1, Eth2, Eth3, and Module ports)—Enable or disable individual Ethernet ports on the AP, as available. You can specify any VLAN ID(s) required for the connection.
802.1X Supplicant—Enable this option to support existing 802.1X authentication on the network that the AP is connecting to. The authentication method used is EAP-TLS. The APs must have firmware version 0.14 or later to utilize this feature. For more information, see Configure Your Access Points as IEEE 802.1X Supplicants
-
Click Save in the upper-right corner of the screen.
The exact Power over Ethernet (PoE), Ethernet port specifications, and other details can also vary according to the AP model. See below for links to AP datasheets and other model-specific considerations. Additionally, not all settings displayed on the screen will apply to every AP model. In such cases, the AP will simply ignore any unsupported settings.