Authorization Options for Custom Guest Portal
If you've enabled a custom guest portal, you can keep the preset authorization method or set up another method such as a configured passphrase, an emailed authorization code, sponsored access, or social sign-in.
With the default guest portal sign-in method, guests complete the form fields and click the Sign In button.

You can set up other sign-in options on the Authorization tab of the Guest Portal Options window.

This topic describes one aspect of Custom Guest Portal setup. To get started with your custom guest portal, see Add a Custom Guest Portal to a WLAN.
Passphrase
Passphrase—Select this check box to require users to enter a passphrase. Then enter the passphrase in the text box.
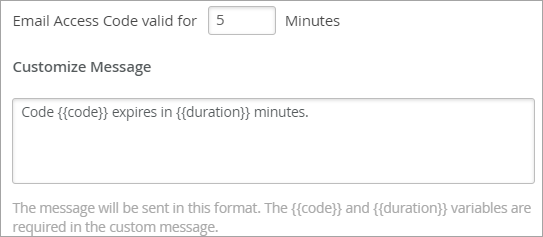
Authentication Code via Email
Authentication code via Email—Select this check box to require users to enter an email address to receive an authentication code. They must then use that code to complete the sign-in process.
After you select the check box, additional fields appear at the bottom of the Guest Portal Options window:
-
Email Access Code valid for—Enter the amount of time (in minutes) that the code remains valid after the email is sent.
-
Customize Message—Add any additional text that you want to include in the email message.
-
When the message is sent, the {{code}} variable displays the code that the user needs to enter.
-
The {{duration}} variable displays the amount of time until the code expires.
-
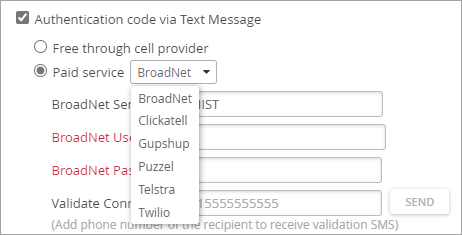
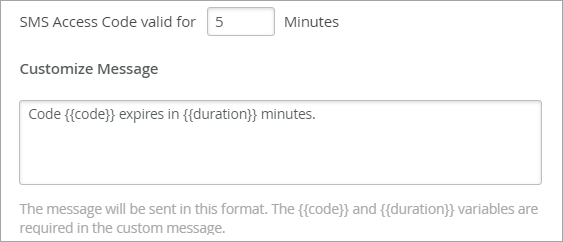
Authentication Code via Text Message
Select Authentication code via Text Message to require users to enter a phone number to receive an authentication code. They must then use that code to complete the sign-in process.
The authentication code can either be sent via a free method via the cell provider, or a paid aggregator. Sending through the cell provider relies upon Email to SMS. The available providers are listed in the Paid service drop-down menu. Select a provider, and then enter your account information.
We have begun to receive reports of guests not receiving the authentication code intermittently or not receiving at all for some of the cell providers.
We have received feedback from cell providers they are deprecating or enforcing limits on the Email to SMS service, and they recommend using aggregator services instead.
Based on this feedback, you may wish to investigate using a paid aggregator service such as Twillio or Broadnet.
For both methods (free or paid), also complete the fields at the bottom of the Guest Portal Options window:
-
SMS Access Code valid for—Enter the amount of time (in minutes) that the code remains valid after the text message is sent.
-
Customize Message—Add any additional text that you want to include in the text message. When the message is sent, the {{code}} variable displays the code that the user needs to enter. The {{duration}} variable displays the amount of time until the code expires.
Sponsored Guest Access
Select Sponsored Guest Access if you want to require a sponsor to approve guests before they can use your network. To identify the personnel who will receive the guests' access requests, enter pre-defined sponsors or a domain.
-
Pre-defined sponsors—Create a list of specific sponsors that guests can chose from. Enter the name and email address for each sponsor.
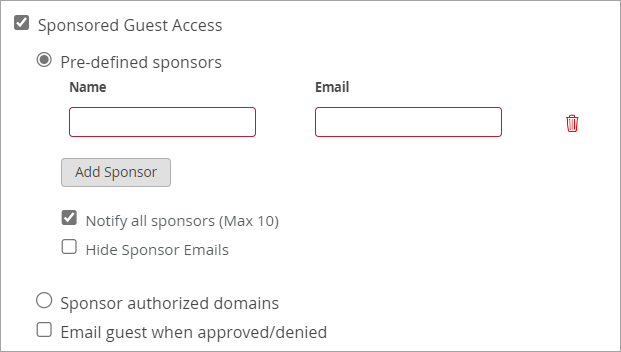
Additional options for pre-defined sponsors:
-
Notify all sponsors—All sponsors will receive all guests' access requests.
-
-
Sponsor authorized domains—Select this option if you want guests' access requests to go to everyone on a specified domain. Enter the domain, or enter multiple domains separated by commas.
Select other options as needed:
-
Email guest when approved/denied—Select this option to send guests an email when the sponsor takes action.
-
Sponsor email request will remain valid for—You can adjust this time period at the bottom of the Guest Portal Options window. For example, if you enter 60 minutes and no one responds, the request expires.
Social Sign-In Options
Social Sign-In Options—Select the check box to allow guests to connect by using Google, Facebook, Amazon, or Microsoft Azure. Then enter the information to enable the authorization.
Google has changed the behavior for Google Sign In for the gmail.com domain. Users are no longer able to sign in through pop-up windows. So far, this change appears to only affect users who sign in with a gmail.com email address. This issue does not seem to affect corporate domains leveraging Google for Single Sign-On.
For help creating custom applications, see:
Authorization Settings
-
Devices remain authorized—Keep the default settings, or enter the number and the unit. For example, you could allow guests to remain connected for 60 minutes, 2 hours, 2 days, or other time frames.
-
After authorization redirect to URL—Select this option if you want to display a specific webpage after users connect. For example, display your company's home page. Or, at a convention, link to the daily events page.