Leveraging Roles in a PSK (Use Case)
Create PSK roles and leverage them in policies to get granular control over network resources and to limit the so-called blast radius if a PSK is compromised.
You can use PSK roles in a WxLAN policy for network segmentation. For example, you can limit IoT devices so that they can only access specified resources. For example, only allow a Wi-Fi camera to access the Wi-Fi camera feed server.
In this use case, you'll use a role to allow BYOD devices to access the internet while blocking them from accessing your private networks.
By following this use case, you'll see how to create a role on an end-user PSK and how to create organization-level labels to define the role and the network resources. Finally, you'll create a WxLAN policy to specify the resources that the BYOD devices can or cannot access. When a client uses PSK to log on to the network, they'll inherit the specified role and will be able to access only the resources allowed by the policy.
Assign a Role to a PSK
To assign a role to a PSK:
-
From the left menu of the Juniper Mist portal, select Organization < Wireless | Preshared Keys
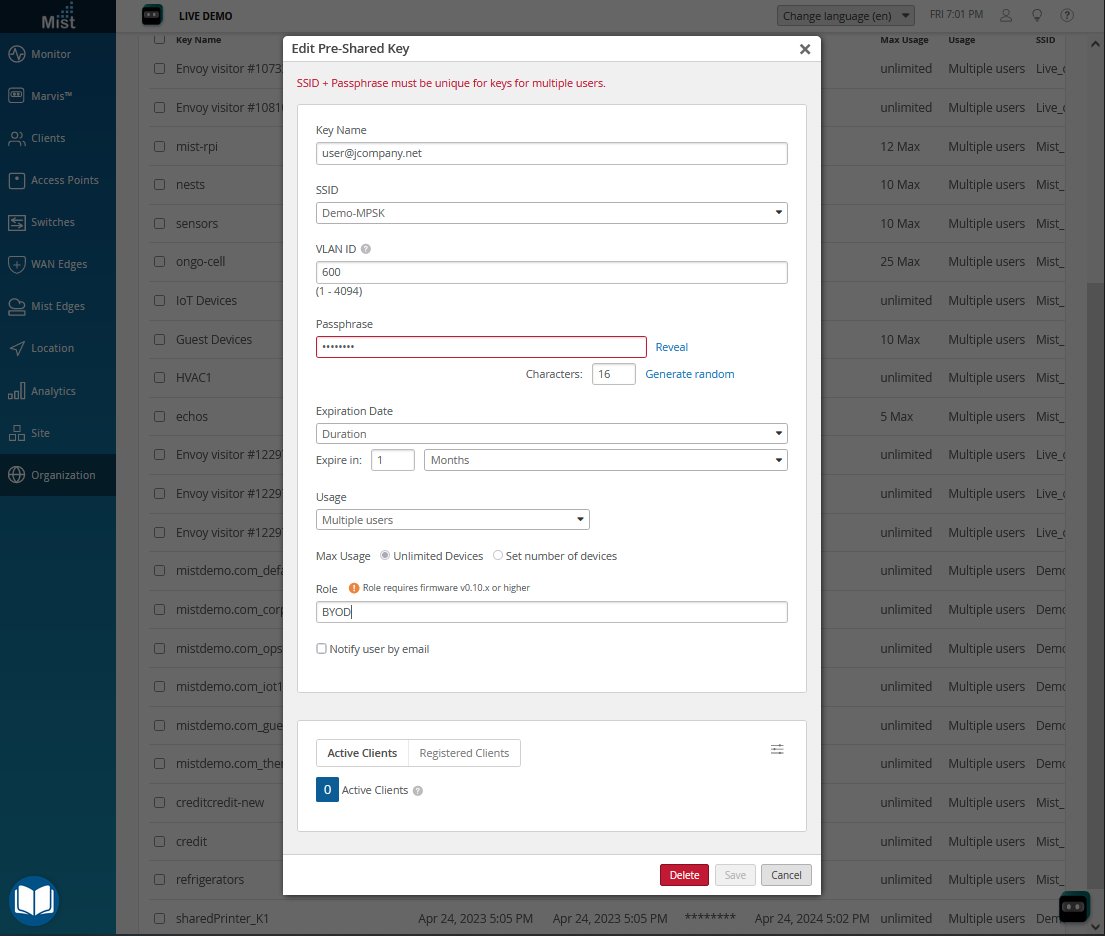
Click an existing end-user PSK, or click Add Key to create one.
On the Create/Edit Pre-Shared Key window, enter the following information to create the key for this example.
Key Name—Enter an email address.
VLAN ID—Enter a VLAN ID on the public network.
Role—Enter BYOD.
 Note:
Note:For more information, see Configure and Manage Pre-Shared Keys.
-
Click Save.
Create Labels for the PSK Role and Resources
In this use case, you'll create three labels to define the role and resources:
-
A user group label to define BYOD devices.
-
An IP address label to define the resources that the role can access (the internet).
-
An IP address label to define the resources that the role cannot access (the private networks).
To find out more about what labels are and how they work, see .
To create labels for use with the PSK role:
-
From the left menu of the Juniper Mist portal, select Organization > Wireless | Labels.
Click Add Label in the top-right corner of the page.
On the New Label page, enter the information for the BYOD label as follows:
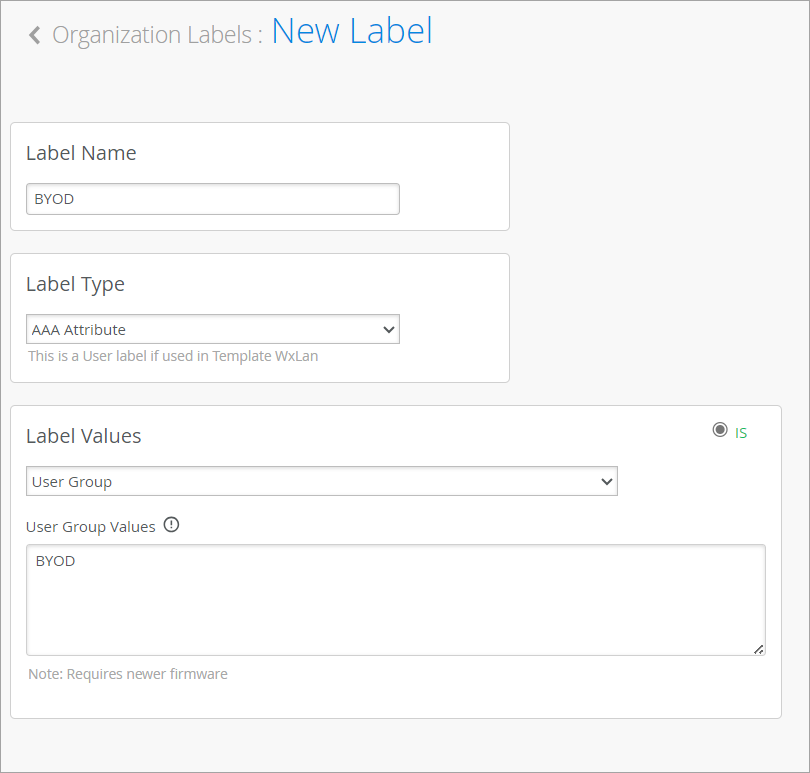
Label Name—Enter BYOD.
Label Type—Select AAA Attribute.
Label Values—Select User Group.
User Group Value—Enter BYOD.
-
Click Create at the top-right corner of the page.
Create a label that will be used to define the internet. For this label, use these values:
- Label Name—Enter internet.
- Label Type—Select IP Address.
- Label Values—Enter 0.0.0.0/0.
Create a label that will be used to define the private networks. For this label, use these values:
- Label Name—Enter private-networks.
- Label Type—Select IP Address.
- Label Values—Enter
10.10.10.0/8,172.168.0.0/12,192.168.0.0/16Note:
By using the RFC1918 definition for private networks, you can cover all the internal networks.
You've created the necessary labels and are ready to use them in the WxLAN access policy.
Create the WxLAN Access Policy
To complete this use case, you need to use the role and the labels to create a policy that specifies the resources that the BYOD role can access.
DHCP and DNS traffic are automatically allowed. You don't need to create a special rule for them. In addition, it's good to know that WxLAN rules are enforced at the AP, and for the egress traffic only. Ingress rules are automatically adjusted based on outgoing traffic.
To create a WxLAN policy:
-
From the left menu of the Juniper Mist portal, navigate to the WLAN template where you want to add the rule.
Note: To find out more about access policies, see WxLAN Access Policies. In the Policy section, click Add Rule.
-
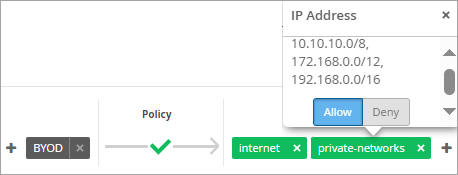
In the User column, click the Add (+) button, and select the BYOD label.
Under Policy, keep the default, Allow.
Under Resources:
Click the Add (+) button, and then click the internet label.
Click the Add (+) button, and then select private network.
At this point, all resources are allowed, as shown below.

Click the icon that you added for private networks, and then click Deny.
Click the ellipsis button (…) on the right side of the page, and then click Enable.
Click Save at the top-right corner of the page.