Use an External Portal for Guest Access
Enable an external portal if you want guests to go to a sign-in portal that your web developers have designed on your own website.
An external portal is a webpage that your WLAN users see after they select your SSID. For example, you can send guests to your company's home page or a sign-in portal that your web developers have set up specifically for your organization.
For added security, you can specify authorized users, allowed subnets, and allowed hostnames. You also can enter a list of hostnames to block.
-
Navigate to the WLAN.
Note:
-
If the WLAN is in a WLAN template, select Organization > Wireless | WLAN Templates, click the template, and then click the WLAN.
-
For a site-level WLAN, select Site > Wireless | WLANs, and then click the WLAN.
-
-
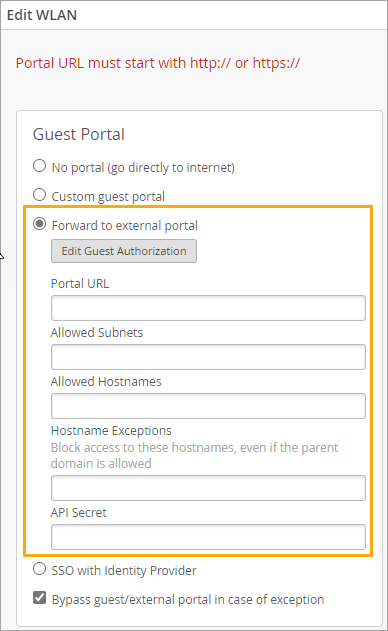
In the Edit WLAN window, under Guest Portal, click
Forward to external portal.
-
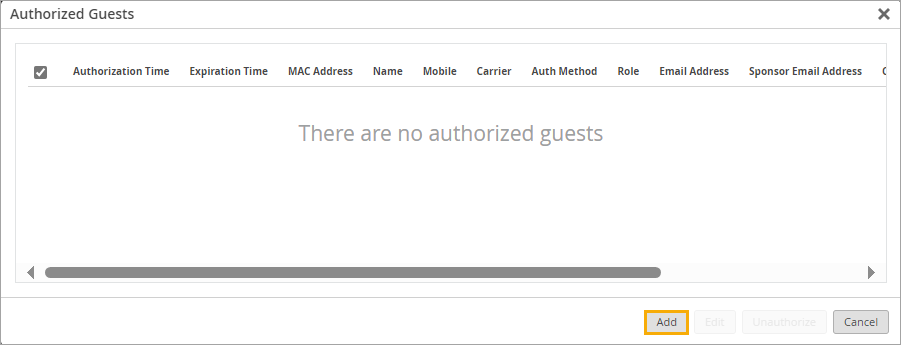
(Optional) Click the Edit Guest Authorization button if you want
to limit access to specific users. Then complete these steps:
-
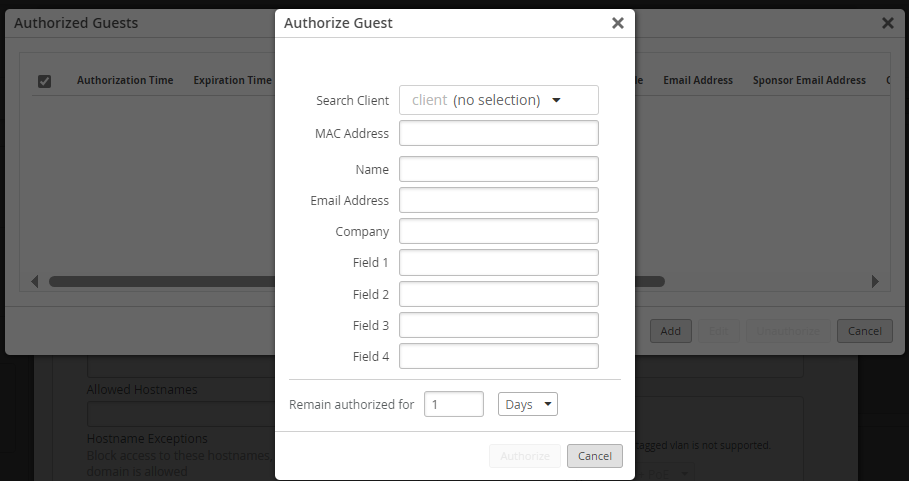
In the Authorized Guests window, click Add.
-
On the Authorize Guest window, enter the guest's MAC Address
(required), optional user information, and the period that the user remains
authorized.
 Note:
Note:You can use the Search Client option to search for a client that is already connected to the WLAN.
- Click Authorize at the bottom of the Authorize Guest window.
- Repeat these steps to add more guests to the list.
-
In the Authorized Guests window, click Add.
-
Enter the Portal URL, beginning with http:// or https://.
Note:
Use the other fields to finetune access. For example, allow only certain subnets or hostnames.
-
Select or clear the Bypass guest/external portal in case of
exception check box.
When this feature is selected, each access point will try to reach the portal or IdP, but if it is not reachable then the AP will automatically authorize the guests to connect to the WLAN.
- Click Save at the bottom of the Edit WLAN window.
Use PHP and Read-Me files to Create Your External Portal
-
Create your external portal by referring to the following sample PHP files and
Read-Me Information.
index.php
<?php
	/*
	  These parameters are sent by Mist on the 302 redirect to this portal page:
	    wlan_id - WLAN object's UUID
	    ap_mac - MAC address of the AP
	    client_mac - MAC address of the client device
	    url - Originally requested url by the client, ie: http://www.mist.com
	    ap_name - Name of the AP
	    site_name - Name of the Site

	  If you want to send the guest to a content page after authorization, configure the $url instead of using the valued that is passed as a parameter.
	*/

	$wlan_id = $_GET['wlan_id'];
	$ap_mac = $_GET['ap_mac'];
	$client_mac = $_GET['client_mac'];
	$url = $_GET['url'];
	$ap_name = $_GET['ap_name'];
	$site_name = $_GET['site_name'];
?>

<html>
	<body>
		<form action="authme.php" method="post">
			<input type="hidden" name="wlan_id" value="<?php echo($wlan_id) ?>" />
			<input type="hidden" name="ap_mac" value="<?php echo($ap_mac) ?>" />
			<input type="hidden" name="client_mac" value="<?php echo($client_mac) ?>" />
			<input type="hidden" name="url" value="<?php echo($url) ?>" />
			<input type="hidden" name="ap_name" value="<?php echo($ap_name) ?>" />
			<input type="hidden" name="site_name" value="<?php echo($site_name) ?>" />

			<table>
				<tr>
					<td><b>Your Full Name</b></td>
					<td><input type="text" name="name" /></td>
				</tr>
				<tr>
					<td><b>Your Email Address</b></td>
					<td><input type="text" name="email" /></td>
				</tr>
				<tr>
					<td><input type="submit" value="Login" /></td>
				</tr>
			</table>
		</form>
	</body>
</html>
authme.php<?php $secret = ''; // WLAN API Key, obtained from the Mist Web GUI after creating the WLAN $wlan_id = $_POST['wlan_id']; $ap_mac = $_POST['ap_mac']; $client_mac = $_POST['client_mac']; $url = $_POST['url']; $ap_name = $_POST['ap_name']; $site_name = $_POST['site_name']; $authorize_min = 525600; // Duration (in minutes) the guest MAC address is authorized before they are redirected back to the portal page) $context = sprintf('%s/%s/%s/%d/%d/%d/%d', $wlan_id, $ap_mac, $client_mac, $authorize_min, ); $token = urlencode(base64_encode($context)); // The below portal fields are passed back to Mist and shown in the Guest Portal Information $name = $_POST['name']; $email = $_POST['email']; $field1 = 'Whatever you want Custom field 1 to be'; $field2 = 'Whatever you want Custom field 2 to be'; $field3 = 'Whatever you want Custom field 3 to be'; $field4 = 'Whatever you want Custom field 4 to be'; $forward = urlencode($url); // URL the user is forwarded to after authorization $extra = '&forward=' . $forward; $extra .= '&name=' . urlencode("$name"); $extra .= '&field1=' . urlencode("$field1"); $extra .= '&field2=' . urlencode("$field2"); $extra .= '&field3=' . urlencode("$field3"); $extra .= '&field4=' . urlencode("$field4"); $extra .= '&email=' . urlencode("$email"); $expires = time() + 120; // The time until which the authorization URL is valid $payload = sprintf('expires=%d&token=%s%s', $expires, $token, $extra); $signature = urlencode(base64_encode(hash_hmac('sha1', $payload, $secret, true))); $final_url = sprintf('http://portal.mist.com/authorize?signature=%s&%s', $signature, $payload); /* Debug code used for testing purposes only If set to true, display the variable details without authorizing the guest in the Mist cloud */ $debugging = false; if ($debugging) { header('Content-Type: text/plain'); echo sprintf('token : urlencode(base64(%s))', $context) . PHP_EOL; echo sprintf(' %s', $token) . PHP_EOL; echo sprintf('foward : %s', $url) . PHP_EOL; echo sprintf(' %s', $foward) . PHP_EOL; echo sprintf('payload-to-sign: %s', $payload) . PHP_EOL; echo sprintf('signature : %s', $signature) . PHP_EOL; echo sprintf('URL : %s', $final_url) . PHP_EOL; echo sprintf('client_mac : %s', $client_mac) . PHP_EOL; echo sprintf('ap_mac : %s', $ap_mac) . PHP_EOL; echo sprintf('ap_name : %s', $ap_name) . PHP_EOL; echo sprintf('wlan_id : %s', $wlan_id) . PHP_EOL; echo sprintf('site_name : %s', $site_name) . PHP_EOL; echo sprintf('name : %s', $name) . PHP_EOL; echo sprintf('email : %s', $email) . PHP_EOL; echo sprintf('field1 : %s', $field1) . PHP_EOL; echo sprintf('field2 : %s', $field2) . PHP_EOL; echo sprintf('field3 : %s', $field3) . PHP_EOL; echo sprintf('field4 : %s', $field4) . PHP_EOL; } else { // Guest is redirected to the Mist portal for authorization. If successful, the Mist portal will then redirect the guest to the $url header('Location: ' . $final_url); } ?>Read-Me InformationThis sample code shows how to use the PHP POST method to pass the below parameter values from the landing page (index.php) to the authorization page (authme.php). The authorization page will also request the user to provide some information. Authorization HOW-TOs ===================== Syntax: signature=<signature>&expires=<epoch-seconds>&token=<token>&forward=<forward> Note: Wired captive portal does not support this mechanism, please use the JWT based one. <forward>: url to forward the user to after authorization <token>: base64("wlan-id/ap-mac/client-mac/authorize_min/0/0/0") <signature>: base64(hmac_sha1(<secret>, "expires=...")) Example token : urlencode(base64("be22bba7-8e22-e1cf-5185-b880816fe2cf/5c5b35001234/d58f6bb4c9d8/480/0/0/0")) = YmUyMmJiYTctOGUyMi1lMWNmLTUxODUtYjg4MDgxNmZlMmNmLzVjNWIzNTAwMTIzNC9kNThmNmJiNGM5ZDgvNDgwLzAvMC8w expires : 1768587994 forward : urlencode("http://www.mist.com") http%3A%2F%2Fwww.mist.com%2F payload-to-sign: expires=1768587994&token=YmUyMmJiYTctOGUyMi1lMWNmLTUxODUtYjg4MDgxNmZlMmNmLzVjNWIzNTAwMTIzNC9kNThmNmJiNGM5ZDgvNDgwLzAvMC8w&forward=http%3A%2F%2Fwww.mist.com%2F secret : test-secret (only used by /authorize-test for testing purpose) signature : J7VJlf2Zlcs%2BOxhVxCf8hL0XYC0%3D final URL : http://portal.mist.com/authorize-test?signature=J7VJlf2Zlcs%2BOxhVxCf8hL0XYC0%3D&expires=1768587994&token=YmUyMmJiYTctOGUyMi1lMWNmLTUxODUtYjg4MDgxNmZlMmNmLzVjNWIzNTAwMTIzNC9kNThmNmJiNGM5ZDgvNDgwLzAvMC8w&forward=http%3A%2F%2Fwww.mist.com%2F Alternatively, you can use JWT tokens: Syntax: jwt=<jwt token> Payload: { "ap_mac": "5c5b35001234", "wlan_id": "be22bba7-8e22-e1cf-5185-b880816fe2cf", "client_mac": "d58f6bb4c9d8", "minutes": 480, "expires": 1768587994, "forward": "http://www.mist.com", "authorize_only": false } Notes: authorize_only: if true and authorization is successful, 200 OK will be returned instead of 302 Redirect the user to the `forward` URL Example ``` import jwt secret = "test-secret" payload = { "ap_mac": "5c5b35001234", "wlan_id": "be22bba7-8e22-e1cf-5185-b880816fe2cf", # only for _wireless_ captive portal "site_id": "ce22bba7-8e22-e1cf-5185-b880816fe2ce", # only for _wired_ captive portal" "port_name": "eth0", # only for _wired_ captive portal" "client_mac": "d58f6bb4c9d8", "minutes": 480, "expires": 1768587994, "forward": "http://www.mist.com", "authorize_only": False } encoded_jwt = jwt.encode(payload, secret, algorithm='HS256') ``` encoded_jwt: eyJhbGciOiJIUzI1NiIsInR5cCI6IkpXVCJ9.eyJhdXRob3JpemVfb25seSI6ZmFsc2UsImV4cGlyZXMiOjE3Njg1ODc5OTQsImFwX21hYyI6IjVjNWIzNTAwMTIzNCIsImZvcndhcmQiOiJodHRwOi8vd3d3Lm1pc3QuY29tIiwiY2xpZW50X21hYyI6ImQ1OGY2YmI0YzlkOCIsIm1pbnV0ZXMiOjQ4MCwid2xhbl9pZCI6ImJlMjJiYmE3LThlMjItZTFjZi01MTg1LWI4ODA4MTZmZTJjZiJ9.msBloHe05XzbzaMEqjsi8XSNWa_3uc--4wucKz3dQGk final URL : http://portal.mist.com/authorize-test?jwt=eyJhbGciOiJIUzI1NiIsInR5cCI6IkpXVCJ9.eyJhdXRob3JpemVfb25seSI6ZmFsc2UsImV4cGlyZXMiOjE3Njg1ODc5OTQsImFwX21hYyI6IjVjNWIzNTAwMTIzNCIsImZvcndhcmQiOiJodHRwOi8vd3d3Lm1pc3QuY29tIiwiY2xpZW50X21hYyI6ImQ1OGY2YmI0YzlkOCIsIm1pbnV0ZXMiOjQ4MCwid2xhbl9pZCI6ImJlMjJiYmE3LThlMjItZTFjZi01MTg1LWI4ODA4MTZmZTJjZiJ9.msBloHe05XzbzaMEqjsi8XSNWa_3uc--4wucKz3dQGkNote:Replace
portal.mist.comwith the appropriate Guest Wi-Fi Portal URL based on the cloud instance in which your Mist organization was created. To look up the Guest Wi-Fi Portal URL for your region, see the Mist Cloud IP Addresses and Ports information in the Juniper Mist Management Guide. -
To get the value that you need for
$secretin auth.php, reopen the Edit WLAN window, and copy the API Secret. -
Configure your authorization page (authme.php) to call the Juniper Mist backend with
the required query string parameters:
?signature=signature&expires=expires&token=token&optional-
expires – The epoch timestamp until which the authorization URL is valid.
-
For example: 1768587994 (This means the authorization URL would expire on January 16, 2026 at 6:26:34 PM UTC.)
-
-
token – A base64 string having format: wlan_id/ap_mac/client_mac/authorize_min/0/0/0
-
For example: be22bba7-8e22-e1cf-5185-b880816fe2cf/5c5b35001234/d58f6bb4c9d8/480/0/0/0
-
-
signature – A base64 string of hashed values, using sha1 as the hashing algorithm and the Guest WLAN’s API Secret as the key. This would have the following format: expires=expires&token=token&optional
-
For example: J7VJlf2Zlcs%2BOxhVxCf8hL0XYC0%3D
-
-
optional – The optional guest details and the URL to which the user is forwarded after authorization, having the following format: forward=url&name=name&email=email&company=company&field1=field1&field2=field2&field3=field3&field4=field4
Note: Ensure all parameter values are passed as base64.
-
For example: forward=http%3A%2F%2Fwww.mist.com%2F
-
-
-
Configure your authorization page to call Juniper Mist for guest authorization. The
final authorization URL would look something like this:
http://portal.mist.com/authorize?signature=J7VJlf2Zlcs%2BOxhVxCf8hL0XYC0%3D&expires=1768587994&token=YmUyMmJiYTctOGUyMi1lMWNmLTUxODUtYjg4MDgxNmZlMmNmLzVjNWIzNTAwMTIzNC9kNThmNmJiNGM5ZDgvNDgwLzAvMC8w&forward=http%3A%2F%2Fwww.mist.com%2F -
Test the external captive portal by connecting a device and attempting to
authenticate.
The device should be redirected to the Juniper Mist portal for authorization. If authentication is successful, the user will be redirected to the URL as defined in your external captive portal code.
Note:Use
/authorizefor the live portal. For testing purposes, you can use/authorize-test, which requires the dummy example values as provided in the Read-Me Information.