Help us improve your experience.

Let us know what you think.

Do you have time for a two-minute survey?


Compare WLAN Guest Portal Options

SUMMARY To allow your guests to access the internet, you can set up the WLAN Guest Portal to allow direct access, enable a simple sign-in form, forward guests to an external sign-in form, or enable Single Sign-On with your identity provider.

You can configure Guest Portal options in your WLAN settings. Keep the default settings to give your guests direct access to the internet, or choose from other options described in the following video and comparison table.

Note:

This topic covers the Guest Portal options in the Edit/Create WLAN window. Alternatively, you can configure guest access via RADIUS server. See Guest Access Using RADIUS Server with MAC Authentication Bypass.

First, we would navigate to WLAN templates and create a new one called guest network.

Then we would add a WLAN, but notice that there are many options on how you could apply this template once we are done. Let's create an SSID called guest fast. We will turn off 2.4 and turn on 6 gigahertz.

Now let's look at building a custom guest portal. You could forward to an existing external portal if one was available. Or you could use SSO with an identity provider.We're gonna focus on building a nice basic portal. In this case, I'm only interested in your email address. There are all kinds of custom fields available if you need them.

Localization is now built in. I want my message to be welcome to my company. And there are a whole bunch of labels available to you to use. Now we pick a logo. I downloaded a basic company logo from the web, and I have a basic background. I want to hide powered by Mist and leave it left justified.

And let's take a look. Nice. I will connect the user's email address and have the standard terms and conditions there to make the lawyers happy. Now is where Mist provides you a wide variety of authorization choices.

We can set up a simple passphrase, We can authorize via an email, and the message is down here. You can use a code sent by text, free texts tend to be less reliable and have more latency or you could use a paid service. Sponsored guest access you can have a predefined sponsor list or allow a whole domain.

And you can have your Google, Facebook, Amazon, or Azure sign on. You know, we're trying to match what you already use or perhaps you now have the tools to try something different. In the case of a contractor, you may want them to be authorized for seven days.

So let's see this in action. I went back to the WLAN template I created and added this guest SSID to my site with this security setup. In the background, I've had two of my devices attached to the guest network, and you can see them both here. Note, I've captured the email addresses entered, and they both use the same passphrase I set up. And if you wanna deauthorize the guest, you can do it here.

This was a quick demo to show you how easy it is to set up a guest network with Mist. We've tried to add as many authorization options possible to match what you're doing now and get you up and running quickly. And now might be the chance to explore some of the modern options that may not have been available to you in the past

Table 1: Compare WLAN Guest Portal Options

Option

Description

Setup

Direct Access (No Portal)

Guests get immediate internet access without authentication.

This is the easiest option unless you have a business need for additional security or you want to collect information about your guests.

No action is needed. This is the default Guest Portal option in WLAN settings.
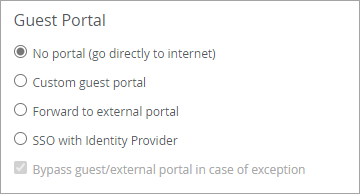
WLAN Settings Window Showing the Guest Portal Options with No Portal Selected

Custom Guest Portal

Guests get internet access by completing a simple sign-in form that you set up in Juniper Mist™.

This is an easy-to-configure approach that allows you to collect some information from your guests.

Optionally, you can enable options such as authorization codes, sponsored guest access, social sign-in, and more.

Select Custom guest portal in the WLAN settings. Keep the default settings or click Configure Portal to change features such as the background image, form fields, text, and authorization methods.

WLAN Settings Window Showing the Guest Portal Options with Custom Guest Portal Selected

For help, see Add a Custom Guest Portal to a WLAN.

External Portal

Guests get internet access by going to a sign-in portal that you've developed outside Juniper Mist.

With this option, you use a sign-in portal that your web developers have specifically designed for your business and your use cases.

Select Forward to external portal in the WLAN settings. Then enter your portal URL and configure other optional settings.

WLAN Settings Window Showing the Guest Portal Options with Forward To External Portal Selected

For help, see Use an External Portal for Guest Access.

Single Sign-On (SSO) with an Identity Provider

Guests get internet access by using your identity provider's sign-in page. (A few examples include Okta, Microsoft Azure, and OneLogin, but most IdPs are supported.)

Select SSO with Identity Provider in the WLAN settings. Then enter the settings for your IdP.

WLAN Settings Window Showing the Guest Portal Options with SSO with Identity Provider Selected

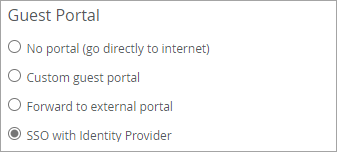
For help, see Use an Identity Provider for Guest Access.