Form Fields for Custom Guest Portal
If you've enabled a custom guest portal, you can keep the preset form fields or customize them to collect exactly the information that you want your guests to provide.
In your custom guest portal, you can keep the default form fields or use the Form Fields tab to collect the exact information that you want your visitors to provide.
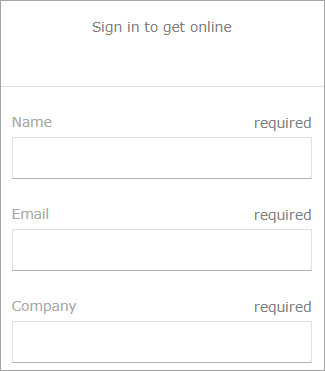
If you keep the default settings, your guests will need to enter their Name, Email, and Company, as shown in the custom guest portal below.
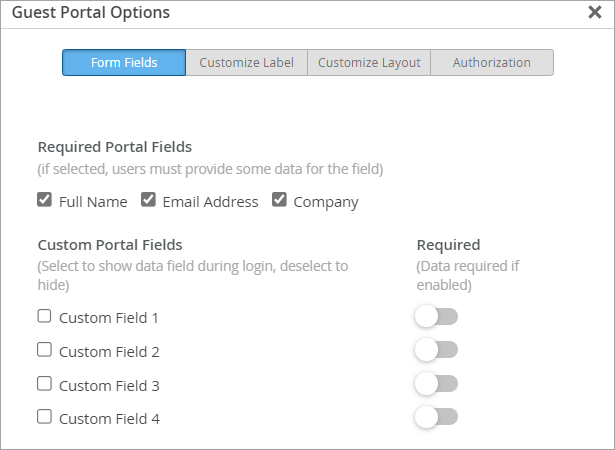
You can make changes on the Form Fields tab of the Guest Portal options window.
This topic describes one aspect of Custom Guest Portal setup. To get started with your custom guest portal, see Add a Custom Guest Portal to a WLAN.
The options include:
-
Required Portal Fields—Select or clear these check boxes to add or remove the required fields (Full Name, Email Address, and Company). If you select these fields, your guests must complete them to get access.
Tip:What if you want one of these fields, such as Company, to be optional? First, clear the check box from the field (because you don't want this required portal field). Then add a Custom Portal field, such as Custom Field 1. On the Customize Labels tab, edit the text for Custom Field 1 so that it says Company. When you preview your portal, you'll see that you now have a Company field that is not required.
-
Custom Portal Fields—Select the checkbox for each additional field that you want to display on the form. Optionally, if you want to require users to complete a field, drag the Required slider to the right.
Note:At this point, the new fields have default labels such as Custom Field 1, Custom Field 2, and so on. You'll be able to replace this text with your own labels on the Customize Label tab.