- Introduction
- Get Started
- play_arrow Apstra GUI
- play_arrow Blueprints and Dashboard
- play_arrow Analytics (Blueprints)
- Analytics Introduction
- play_arrow Dashboards
- play_arrow Anomalies
- play_arrow Widgets
- play_arrow Probes
- play_arrow Predefined Reports (Tech Preview)
- play_arrow Root Causes
- play_arrow Staged (Datacenter Blueprints)
- Blueprint-Wide Search
- play_arrow Physical
- play_arrow Build
- play_arrow Selection
- play_arrow Topology
- play_arrow Nodes
- Nodes (Datacenter)
- Unassign Device (Datacenter)
- Update Deploy Mode (Datacenter)
- Generic Systems vs. External Generic Systems
- Create Generic System
- Create External Generic System
- Create Access Switch
- Update Node Tag (Datacenter)
- Update Port Channel ID Range
- Update Hostname (Datacenter)
- Edit Generic System Name
- Edit Device Properties (Datacenter)
- View Node's Static Routes
- Delete Node
- play_arrow Links
- Links (Datacenter)
- Add Links to Leaf
- Add Links to Spine
- Add Links to Generic System
- Add Links to External Generic System
- Add Leaf Peer Links
- Add Link per Superspine (5-Stage)
- Form LAG
- Create Link in LAG
- Break LAG
- Update LAG Mode
- Update Link Tag (Datacenter)
- Update Link Speed
- Update Link Speed per Superspine (5-Stage)
- Mixed Link Speeds between Leaf and Spine
- Update Link Properties
- Delete Link (Datacenter)
- Export Cabling Map (Datacenter)
- Import Cabling Map (Datacenter)
- Edit Cabling Map (Datacenter)
- Fetch LLDP Data (Datacenter)
- play_arrow Interfaces
- play_arrow Racks
- play_arrow Pods
- play_arrow Planes
-
- play_arrow Virtual
- play_arrow Virtual Networks
- play_arrow Routing Zones
- Static Routes (Virtual)
- Protocol Sessions (Virtual)
- play_arrow Virtual Infrastructure
- play_arrow Statistics
-
- play_arrow Policies
- play_arrow Endpoints
- Security Policies
- Interface Policies
- Routing Policies
- Routing Zone (VRF) Constraints
- play_arrow Routing Zone Policy (4.2.0)
-
- play_arrow Data Center Interconnect (DCI)
- play_arrow Catalog
- play_arrow Logical Devices
- play_arrow Interface Maps
- play_arrow Property Sets
- play_arrow Configlets
- play_arrow AAA Servers
- play_arrow Tags
-
- play_arrow Tasks
- play_arrow Connectivity Templates
- Connectivity Templates Introduction
- play_arrow Primitives
- Primitive: Virtual Network (Single)
- Primitive: Virtual Network (Multiple)
- Primitive: IP Link
- Primitive: Static Route
- Primitive: Custom Static Route
- Primitive: BGP Peering (IP Endpoint)
- Primitive: BGP Peering (Generic System)
- Primitive: Dynamic BGP Peering
- Primitive: Routing Policy
- Primitive: Routing Zone Constraint
- User-defined
- Pre-defined
- Create Connectivity Template for Multiple VNs on Same Interface (Example)
- Create Connectivity Template for Layer 2 Connected External Router (Example)
- Update Connectivity Template Assignments
- Edit Connectivity Template
- Delete Connectivity Template
- play_arrow Fabric Settings (4.2.1)
- play_arrow Fabric Policy (4.2.1)
- play_arrow Severity Preferences (4.2.1)
-
- play_arrow Fabric Settings (4.2.0)
- play_arrow Fabric Policy (4.2.0)
- play_arrow Virtual Network Policy (4.2.0)
- play_arrow Anti-Affinity Policy (4.2.0)
- play_arrow Validation Policy (4.2.0)
-
- BGP Route Tagging
- play_arrow Staged (Freeform Blueprints)
- Freeform Introduction
- play_arrow Blueprints
- play_arrow Physical
- play_arrow Selection
- play_arrow Topology
- play_arrow Systems
- Systems Introduction (Freeform)
- Create Internal System (Freeform)
- Create External System (Freeform)
- Update Config Template Assignment (Freeform)
- Update System Name (Freeform)
- Update Hostname (Freeform)
- Update Device Profile Assignment (Freeform)
- Update System ID Assignment (Freeform)
- Update Deploy Mode (Freeform)
- Update System Tag Assignment (Freeform)
- Delete System (Freeform)
- Device Context (Freeform)
- play_arrow Links
-
- play_arrow Resource Management
- Resource Management Introduction (Freeform)
- play_arrow Blueprint Resources
- play_arrow Allocation Groups
- play_arrow Local Pools
- play_arrow Catalog
- play_arrow Config Templates
- play_arrow Device Profiles
- play_arrow Property Sets
- play_arrow Tags
-
- play_arrow Tasks
- play_arrow Uncommitted (Blueprints)
- play_arrow Active (Datacenter Blueprints)
- play_arrow Time Voyager (Blueprints)
- play_arrow Design
- play_arrow Logical Devices
- play_arrow Interface Maps
- play_arrow Rack Types
- play_arrow Templates
- play_arrow Config Templates
- play_arrow Configlets (Datacenter)
- play_arrow Property Sets (Datacenter)
- play_arrow TCP/UDP Ports
- play_arrow Tags
-
- play_arrow Resources
- play_arrow Analytics
- play_arrow Apstra Flow
- Apstra Flow Introduction
- System Requirements
- play_arrow Dashboards
- play_arrow Supported Flow Records
- play_arrow Flow Enrichment
- play_arrow Monitor Flow Data
- play_arrow Configuration Reference
- play_arrow API
- play_arrow Additional Documentation
- play_arrow Knowledge Base
-
- play_arrow External Systems (RBAC Providers)
- play_arrow Providers
- play_arrow Provider Role Mapping
-
- play_arrow Platform
- play_arrow User / Role Management
- play_arrow Security
- Syslog Configuration (Platform)
- Receivers (Platform)
- Global Statistics (Platform)
- Event Log (Audit Log)
- play_arrow Apstra VM Clusters
- play_arrow Developers
- play_arrow Technical Support
- Check Apstra Versions and Patent Numbers
-
- Favorites & User
- play_arrow Apstra Server Management
- Apstra Server Introduction
- Monitor Apstra Server via CLI
- Restart Apstra Server
- Reset Apstra Server VM Password
- Reinstall Apstra Server
- Apstra Database Overview
- Back up Apstra Database
- Restore Apstra Database
- Reset Apstra Database
- Migrate Apstra Database
- Replace SSL Certificate on Apstra Server with Signed One
- Replace SSL Certificate on Apstra Server with Self-Signed One
- Change Apstra Server Hostname
- Apstra CLI Utility
- play_arrow Guides
- play_arrow References
- play_arrow Feature Matrix
- play_arrow Devices
- play_arrow Analytics
- play_arrow Predefined Dashboards (Analytics)
- play_arrow Predefined Probes (Analytics)
- Probe: BGP Monitoring
- Probe: Bandwidth Utilization
- Probe: Critical Services: Utilization, Trending, Alerting
- Probe: Device Environmental Checks
- Probe: Device System Health
- Probe: Device Telemetry Health
- Probe: Device Traffic
- Probe: Drain Traffic Anomaly
- Probe: ECMP Imbalance (External Interfaces)
- Probe: ECMP Imbalance (Fabric Interfaces)
- Probe: ECMP Imbalance (Spine to Superspine Interfaces)
- Probe: ESI Imbalance
- Probe: EVPN Host Flapping
- Probe: EVPN VXLAN Type-3 Route Validation
- Probe: EVPN VXLAN Type-5 Route Validation
- Probe: External Routes
- Probe: Hot/Cold Interface Counters (Fabric Interfaces)
- Probe: Hot/Cold Interface Counters (Specific Interfaces)
- Probe: Hot/Cold Interface Counters (Spine to Superspine Interfaces)
- Probe: Hypervisor and Fabric LAG Config Mismatch Probe (Virtual Infra)
- Hypervisor and Fabric VLAN Config Mismatch Probe (Virtual Infra)
- Probe: Hypervisor MTU Mismatch Probe (Virtual Infra - NSX-T Only)
- Probe: Hypervisor MTU Threshold Check Probe (Virtual Infra)
- Probe: Hypervisor Missing LLDP Config Probe (Virtual Infra)
- Probe: Hypervisor Redundancy Checks Probe (Virtual Infra)
- Probe: Interface Flapping (Fabric Interfaces)
- Probe: Interface Flapping (Specific Interfaces)
- Probe: Interface Policy 802.1x
- Probe: LAG Imbalance
- Probe: Leafs Hosting Critical Services: Utilization, Trending, Alerting
- Probe: Link Fault Tolerance in Leaf and Access LAGs
- Probe: MLAG Imbalance
- Probe: Multiagent Detector
- Probe: Optical Transceivers
- Probe: Packet Discard Percentage
- Probe: Spine Fault Tolerance
- Probe: Total East/West Traffic
- Probe: VMs without Fabric Configured VLANs Probe (Virtual Infra)
- Probe: VXLAN Flood List Validation
- play_arrow Probe Processors (Analytics)
- Processor: Accumulate
- Processor: Average
- Processor: Comparison
- Processor: EVPN Type 3
- Processor: EVPN Type 5
- Processor: Extensible Service Data Collector
- Processor: Generic Graph Collector
- Processor: Generic Service Data Collector
- Processor: Interface Counters
- Processor: Logical Operator
- Processor: Match Count
- Processor: Match Percentage
- Processor: Match String
- Processor: Max
- Processor: Min
- Processor: Periodic Average
- Processor: Range
- Processor: Ratio
- Processor: Service Data Collector
- Processor: Set Comparison
- Processor: Set Count
- Processor: Standard Deviation
- Processor: State
- Processor: Subtract
- Processor: Sum
- Processor: System Utilization
- Processor: Time in State
- Processor: Traffic Monitor
- Processor: Union
- Processor: VXLAN Floodlist
- Configlet Examples (Design)
- play_arrow Apstra CLI Commands
- Apstra EVPN Support Addendum
- Apstra Server Configuration File
- Graph
- Juniper Apstra Technology Preview
-
Upgrade Device NOS
Upgrade the network operating systems (NOS) of your Apstra-managed network devices from within the Apstra environment.
We highly recommend that you become familiar with this procedure before upgrading a device NOS.
NOS Upgrade Overview
You can upgrade a device NOS within the Apstra environment with a few steps. If you've defined your own device profiles, you may need to update them. Then you'll register the new OS image that you obtained from the vendor, and click a button to start the upgrade. Apstra takes care of upgrade tasks and other requirements and ensures that pristine config is updated.
For information about supported upgrade paths, see NOS Upgrade Paths in the References section.
Apstra software ships with built-in device profiles that support specific OS versions. When you upgrade the Apstra server, device profiles with the OS versions that are supported in the new Apstra version are also updated. You can then upgrade the NOS to one of the newly supported versions.
For example, Apstra version 4.0.0 supports Arista EOS versions as shown in the OS
version selector (4.(18|20|21|22|23|24)
) in the device profile.
That is, it supports versions 4.18, 4.20, 4.21, 4.22, 4.23, and 4.24. Whereas,
Apstra version 4.0.2 supports EOS versions 4.18, 4.20, 4.21, 4.22, 4.23, 4.24, and
4.25 (4.(18|20|21|22|23|24|25)
). 4.25 is a newly supported version.
If you upgrade the Apstra server to version 4.0.2, you can upgrade Arista devices to
EOS version 4.25.
However, device profiles that you've created (cloned) yourself, are not managed in the Apstra environment, so when you upgrade the Apstra server those device profiles aren't automatically updated with newly supported versions. You'll need to follow a few extra steps to add them as described in the next section.
Before beginning the process, make sure of the following:
- Make sure that you understand the device configuration lifecycle and that you're comfortable with managing deploy modes.
- Make sure that Apstra software is managing the device you're upgrading. Navigate to Devices > Managed Devices and confirm that your device is in the table and that it is acknowledged (with a green check mark).
- Before upgrading NOS, delete any device AAA/TACACS+ configlets from the blueprint. After the upgrade is complete, you can reapply them.
- Make sure that the Admin state of the device is set to normal. Navigate to Devices > Managed Devices, click on the Management IP of the device to confirm the admin state. (Do NOT set the Admin state to MAINT/DECOMM or the device could enter an unrecoverable state.)
- Make sure that the Apstra version specified is the same on both the Apstra server and the device. If they are different, you can't upgrade the device. If you attempt to upgrade with different versions, you will not receive a warning; the task status remains in the IN PROGRESS state indefinitely.
Update User-defined Device Profiles
Make sure that your devices are in the appropriate states for upgrading as described in the overview above.
If you've created (cloned) your own device profiles, you'll need to manually specify OS versions in the device profile and the blueprint that uses that device profile. (If your devices use built-in device profiles, then proceed to the next section to register the new OS image.)
Register / Upload OS Image
- Obtain the OS image from the device vendor.CAUTION:
Make sure to select a compatible device operating system image for the device that you're upgrading. If you use an incompatible image and the upgrade fails, the deployment lock is not released automatically, even if you recover the device. To release the deployment lock and activate the device again, remove the device assignment from the blueprint, decommission and normalize the device (from Devices > Managed Devices), then reassign the device to the blueprint. For assistance, contact Juniper Support.
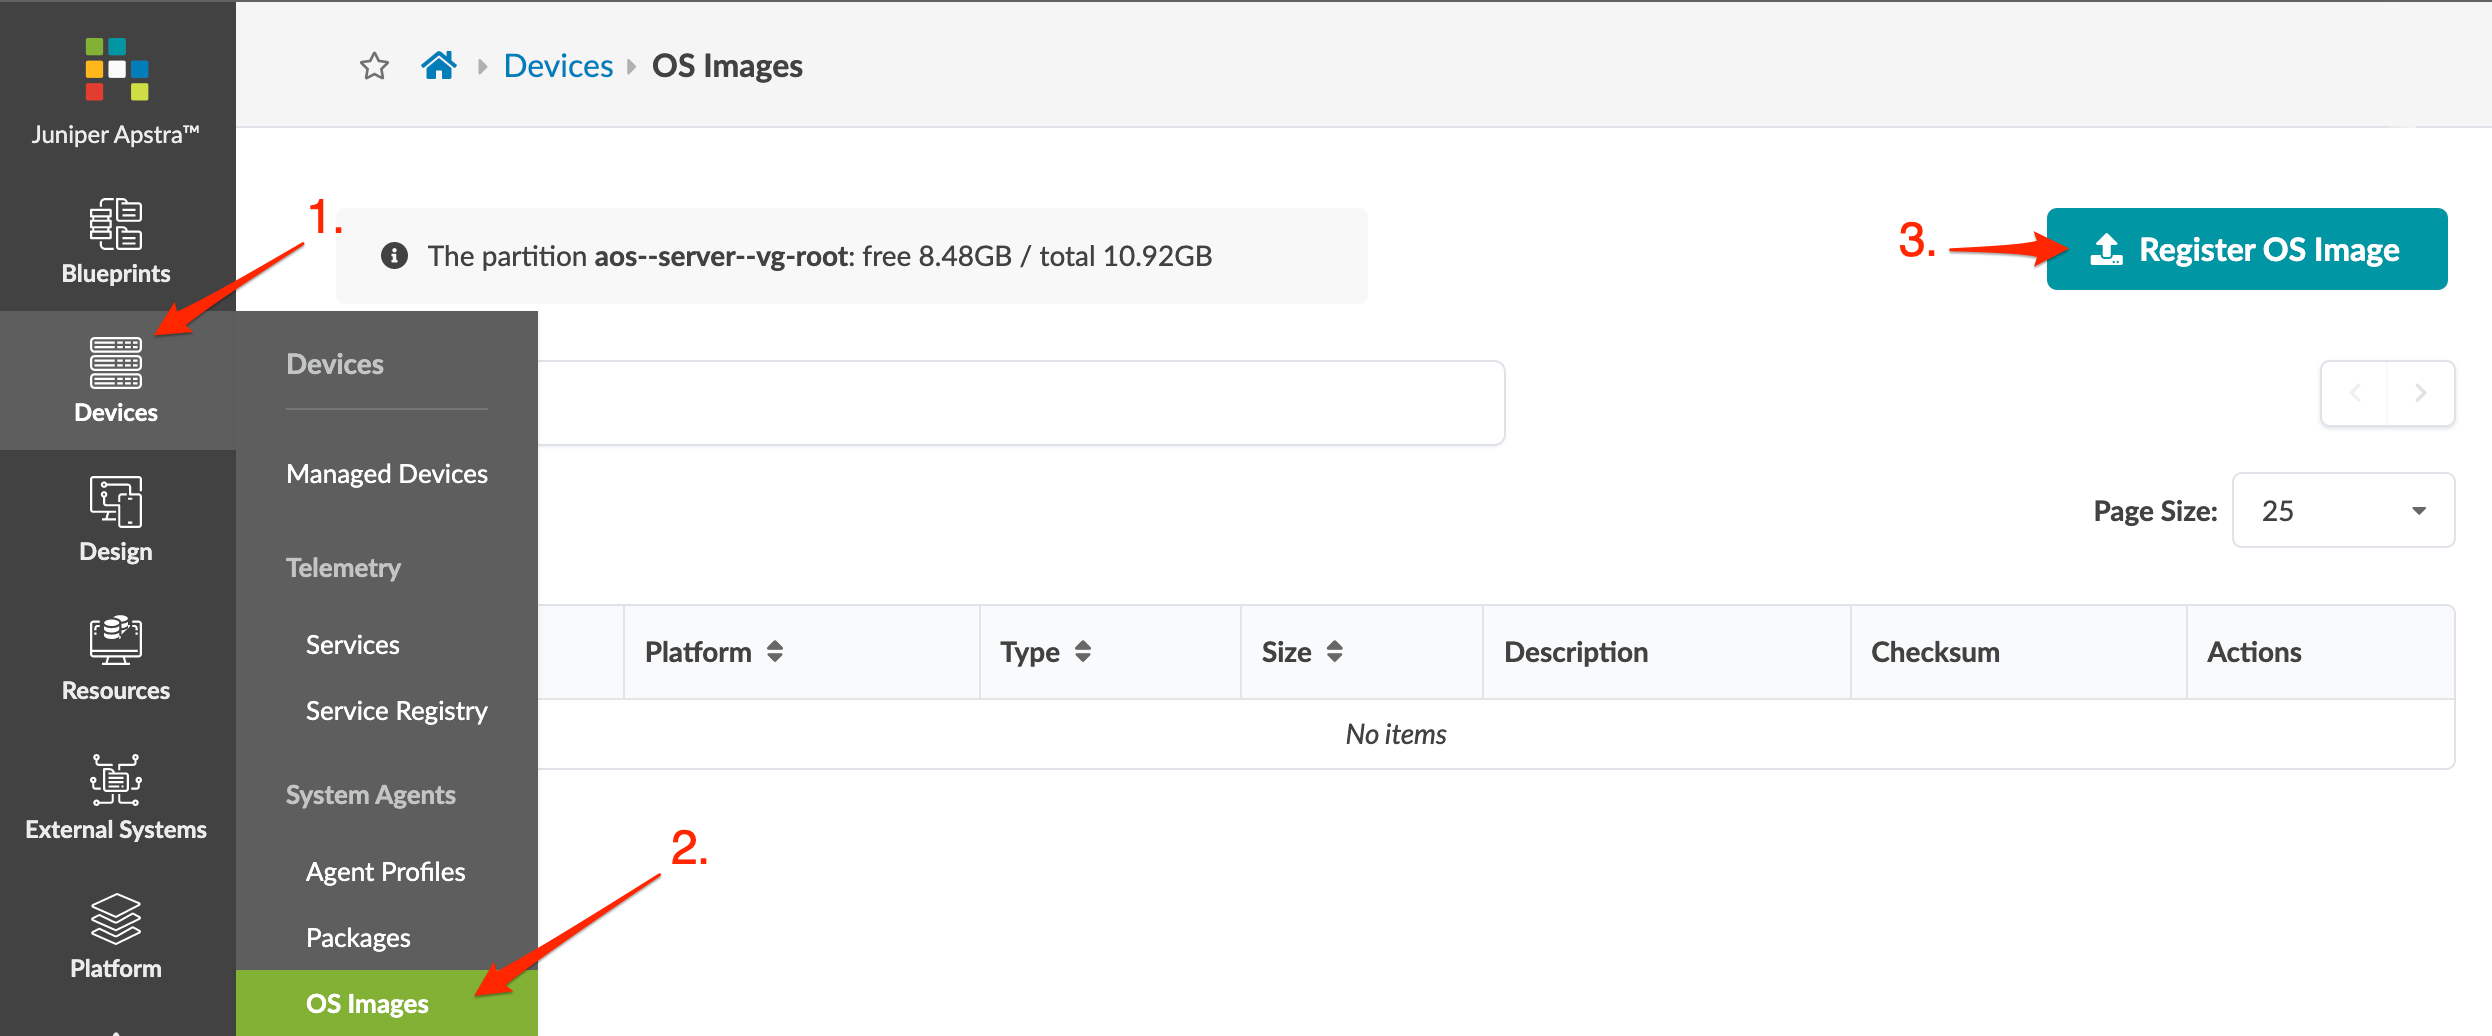
- From the left navigation menu, navigate to Devices > System Agents
> OS Images and click Register OS
Image (top-right). You can see how much space is left for
uploading new NOS images, and if the partition has under 5GB of free space a
warning appears when you register.)
- Select the platform from the drop-down list (EOS, NXOS, SONIC, JUNOS) and enter a description.
- Either upload the image directly to the Apstra server or provide a URL download link pointing to an image file on an accessible HTTP server (described in sections below).
Method One: Upload Image
- Select Upload Image, then either click
Choose File and navigate to the image on your
computer, or drag and drop the image from your computer into the dialog
window and click Open.
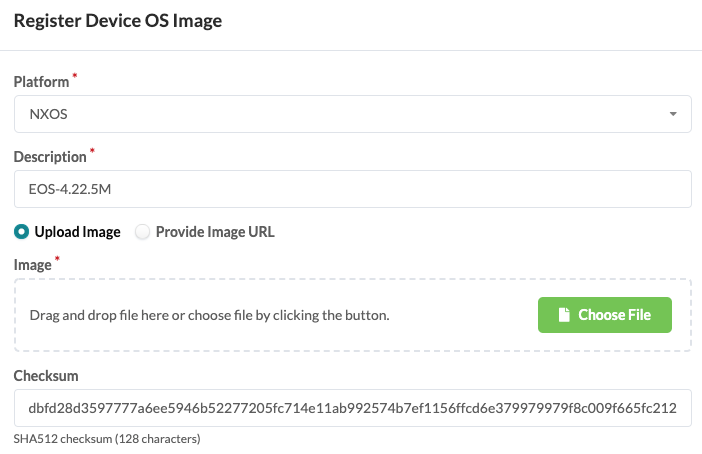
- Add a checksum (optional) (described in section below).
- Click Upload to upload and register the image with the Apstra software. The image and image size appear in the table view.
- If the (optional) checksum is not verified, the upgrade process stops, before the device reboots.
Method Two: Provide Image URL
If another HTTP server is accessible to the devices being upgraded via their network management port, you can register the OS Image instead of uploading it. Only HTTP URLs are supported. (HTTPS, FTP, SFTP, SCP and others are not supported.)
- Select Provide Image URL.
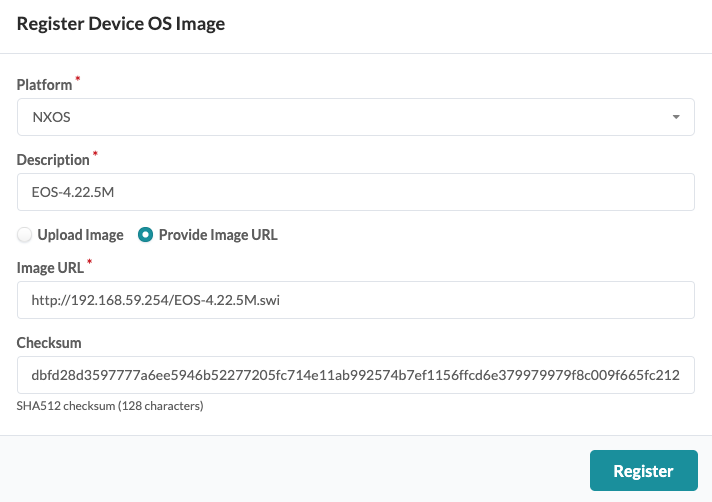
- Enter the URL that points to the image on the other server.
- Add a checksum (optional) (described in the section below).
- Click Register to register the image with the Apstra software. The image and image size appear in the table view.
- If the (optional) checksum is not verified, the upgrade process stops, before the device reboots.
Add Checksum (Optional)
The platform determines the type of checksum that's used:
- Juniper Junos - MD5 (32 characters) or SHA256 (64 characters)
- Enterprise SONiC - MD5 (32 characters)
- Cisco NX-OS - SHA512 (128 characters)
- Arista EOS - SHA512 (128 characters)
If the device vendor provides a checksum file, we recommend that you download the file and copy it to the Checksum field. If a checksum file is not available, you can generate a checksum with the Linux md5sum or shasum commands, as applicable, or with equivalent programs.
$ shasum -a 512 EOS-4.20.11M.swi dbfd28d3597777a6ee5946b52277205fc714e11ab992574b7ef1156ffcd6e379979979f8c009f665fc21212e4d38d1794a412d79bab149f859aa72be417c0975 EOS-4.20.11M.swi $